Tutorial: How to Set Up Wallet Keys
Learn how to create or recover your wallet keys in Tetrapolar.

Your wallet keys are what let you sign bitcoin transactions inside Tetrapolar. This guide walks you through creating a brand-new set of keys, and later recovering them on the same or a different device.
Before you start, it helps to know two terms:
- Recovery phrase (seed): A list of 12 words. This is the master backup for your wallet — every key is rebuilt from it. Anyone who has these words can sign transactions as you. Treat it like the keys to a safe.
- Device passphrase: A password that encrypts your seed on this one device. It is not the same as your recovery phrase, and it does not recover your funds. It only protects the copy of your seed stored in this browser.
The single most important rule: Your recovery phrase recovers your wallet. Your device passphrase only unlocks it on a specific device. If you lose the passphrase, you can re-import with your seed. If you lose the seed, your keys are gone for good.
Part 1 — Creating New Wallet Keys
Step 1: Open the Bitcoin Keys page
Go to Settings → Bitcoin Keys.
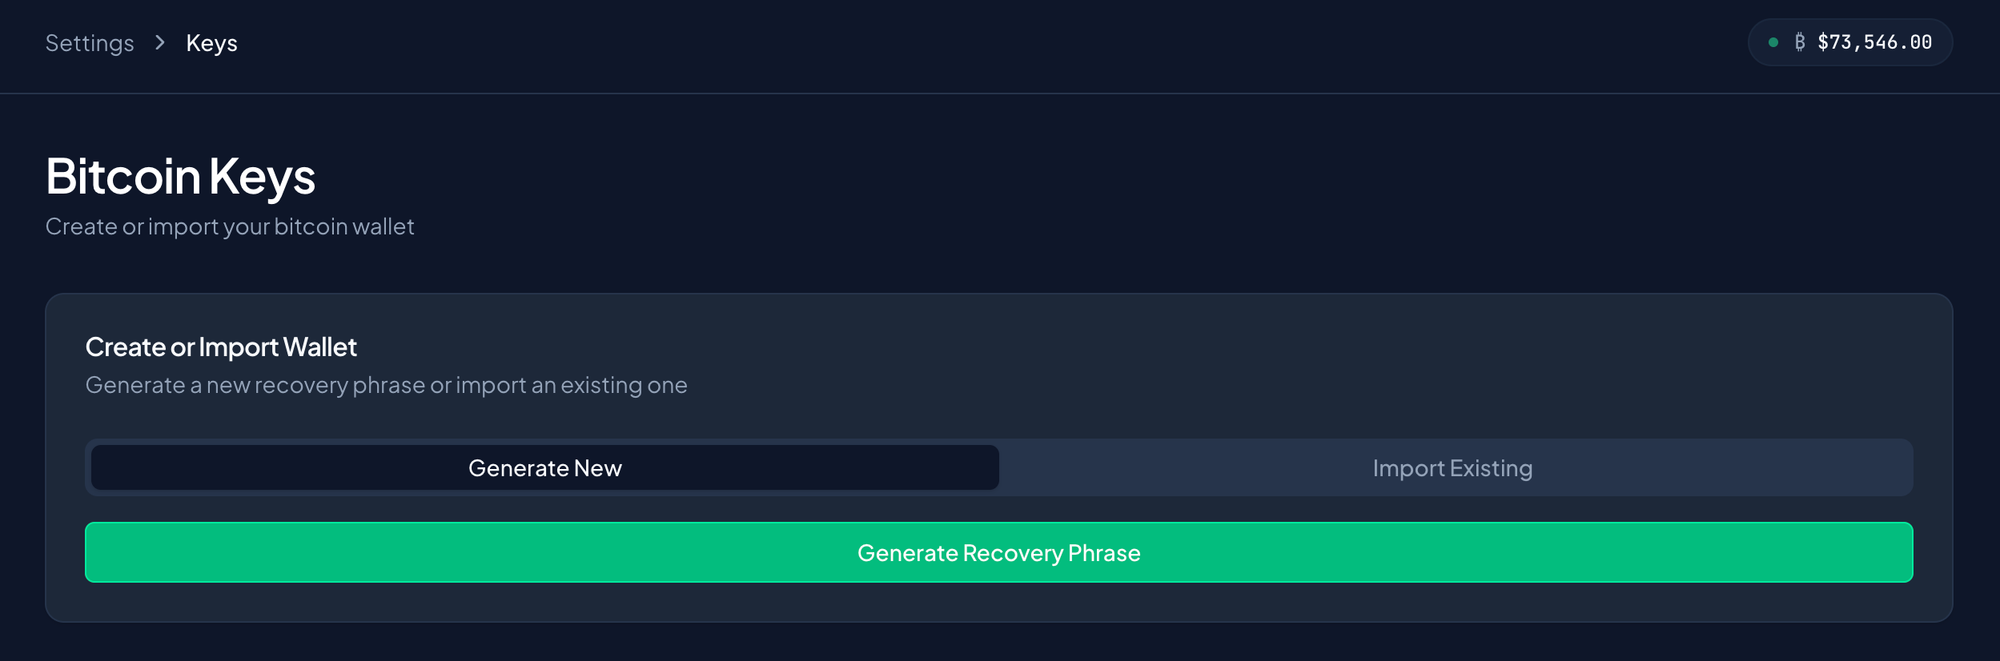
If you don't have any keys yet, you'll see a card titled "Create or Import Wallet" with two tabs: Generate New and Import Existing. To make new keys, select Generate New.
Step 2: Generate your recovery phrase
Click Generate Recovery Phrase.
A panel titled "Your Recovery Phrase" appears with your 12 words and this warning:
Write this down and store it safely. Anyone with this phrase can sign transactions on your behalf.
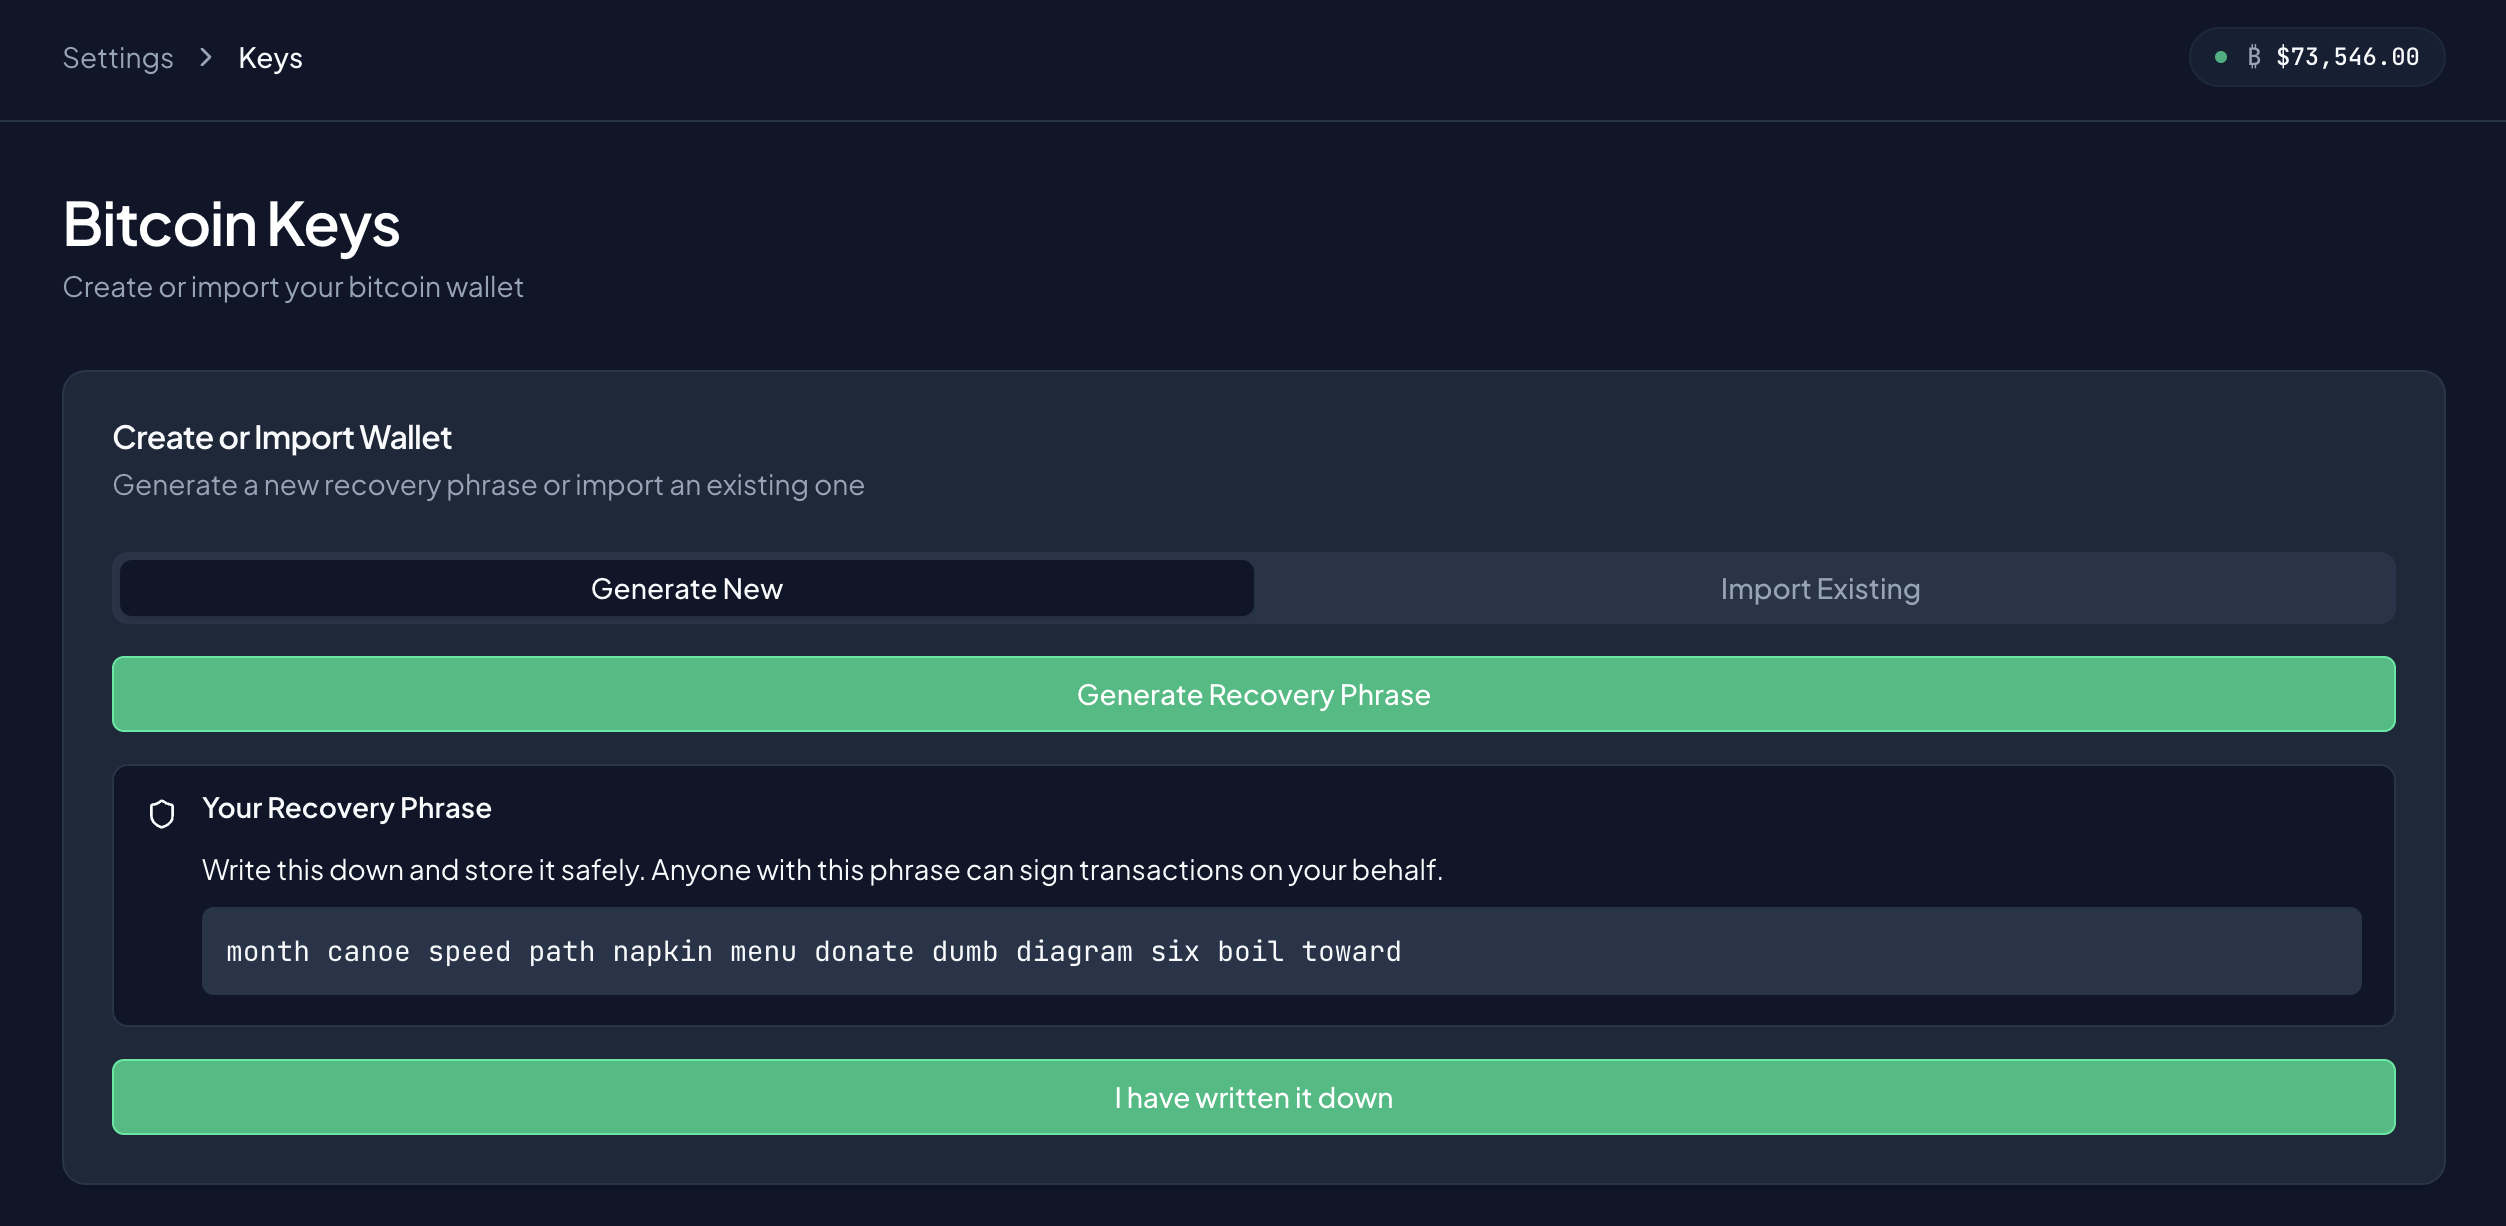
Write it down now, on paper. Do not screenshot it, email it, or paste it into a notes app. Store the paper somewhere safe and private. If you ever lose access to this device, these 12 words are the only way back into your wallet.
Step 3: Confirm you wrote it down
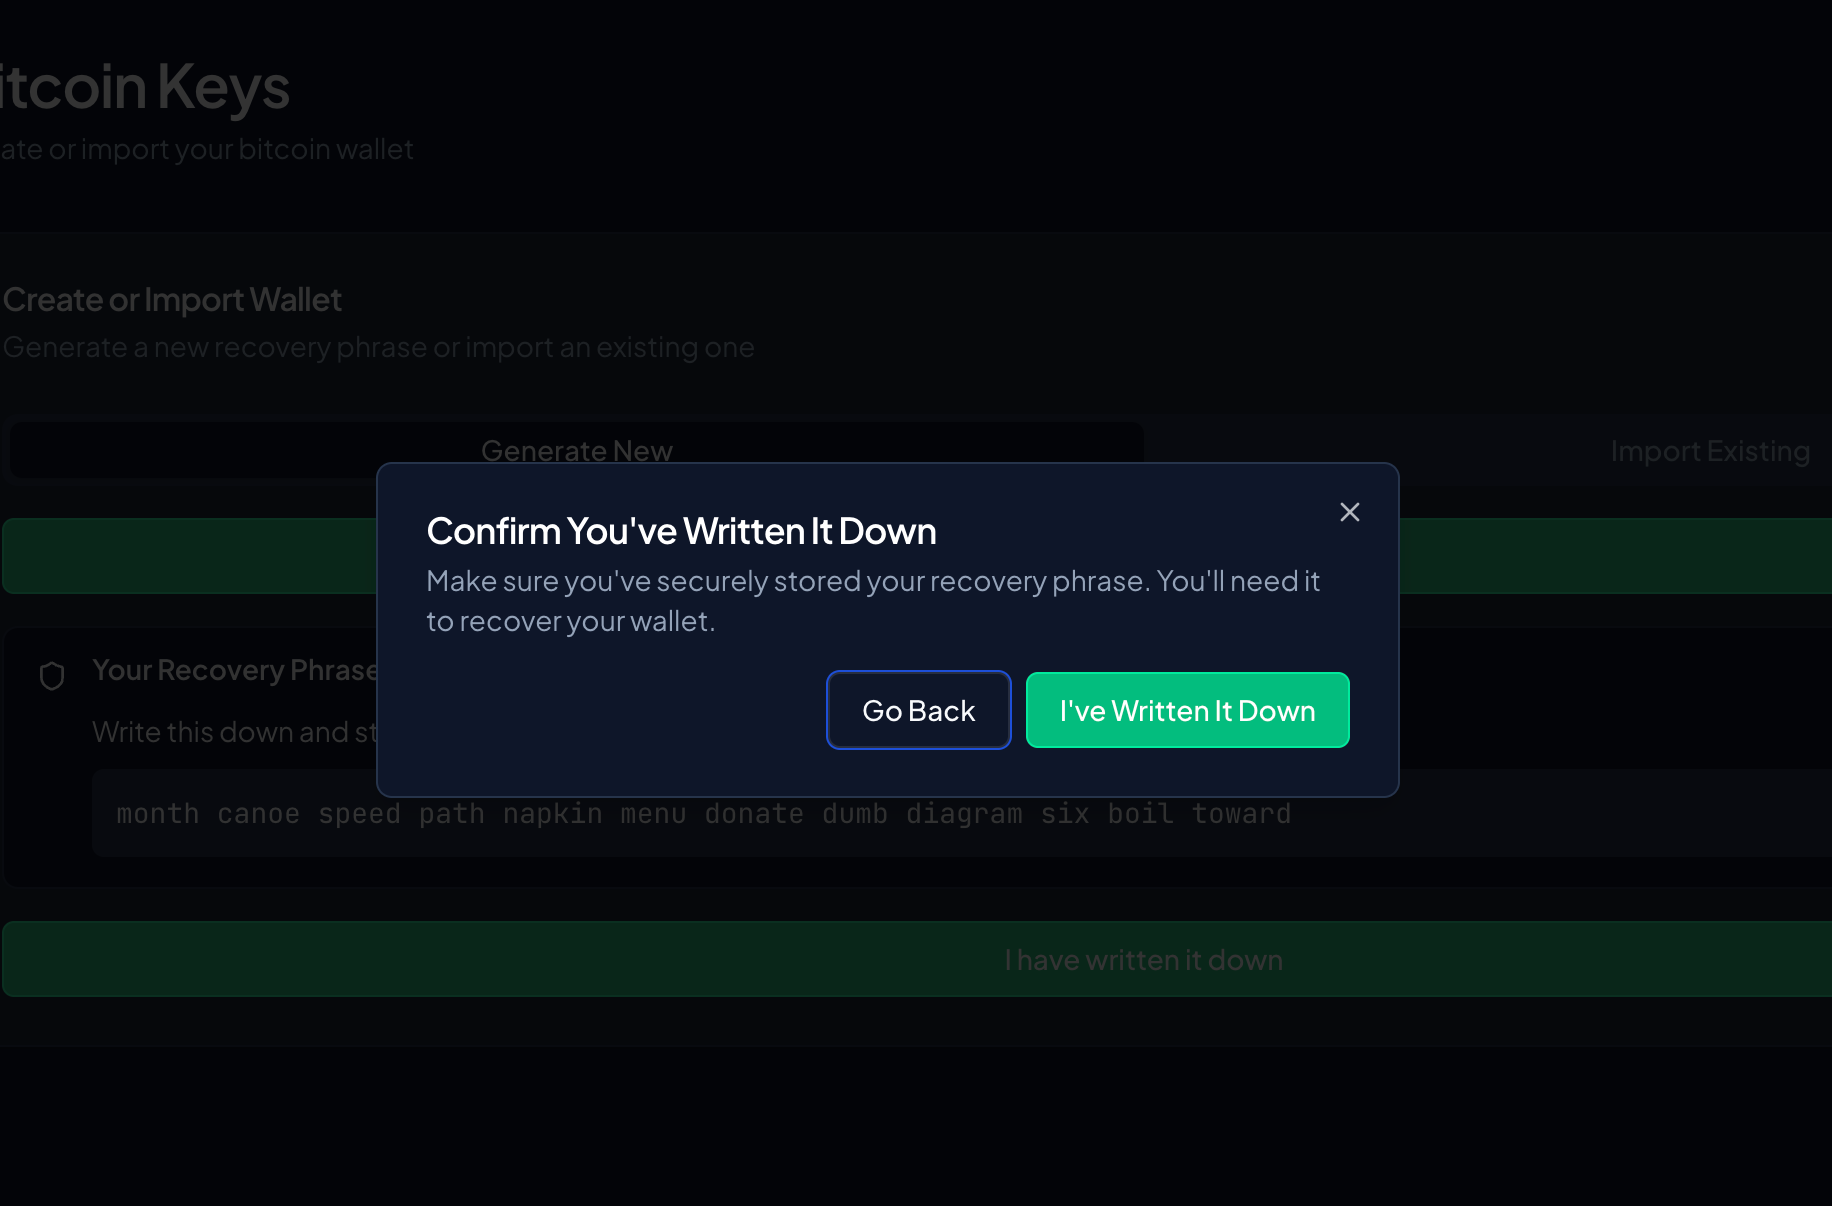
When your phrase is safely written down, click I have written it down.
A dialog appears titled "Confirm You've Written It Down". Click I've Written It Down to continue.
Step 4: Verify your phrase
The app now asks you to prove you have the phrase saved. Under "Confirm Recovery Phrase", you'll see a prompt:
Please enter the following words from your recovery phrase:
It picks a couple of words at random (for example, Word #3 and Word #8). Type each one exactly as it appears in your written-down list.
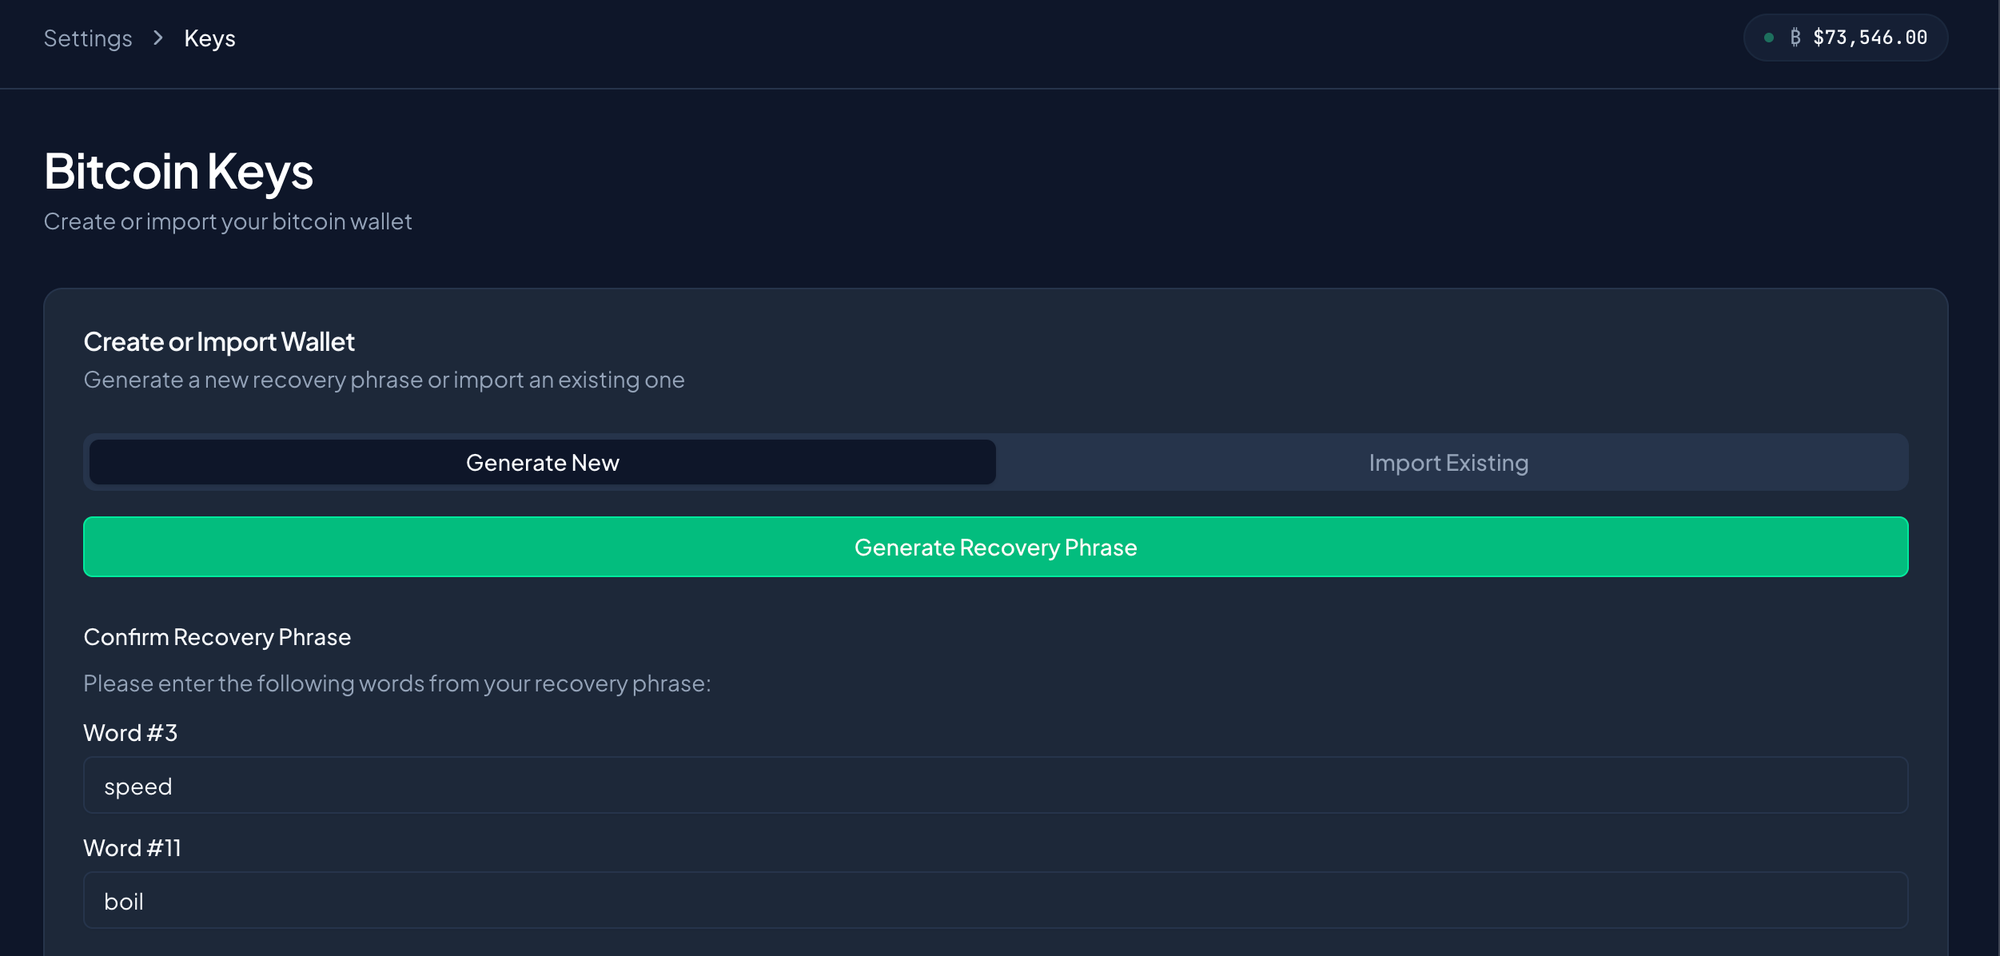
Tip: If a word doesn't match, double-check your written copy against the order shown. The numbers refer to the word's position in the phrase.
Step 5: Set your device passphrase
Now create the password that encrypts your seed on this device.
- Device Passphrase — type a strong passphrase. The field reads "Encrypt your seed on this device." You can tap the eye icon to show or hide what you type.
- Confirm Device Passphrase — type it again to make sure it matches.
Below the field you'll see: "This passphrase encrypts your seed on this device only."
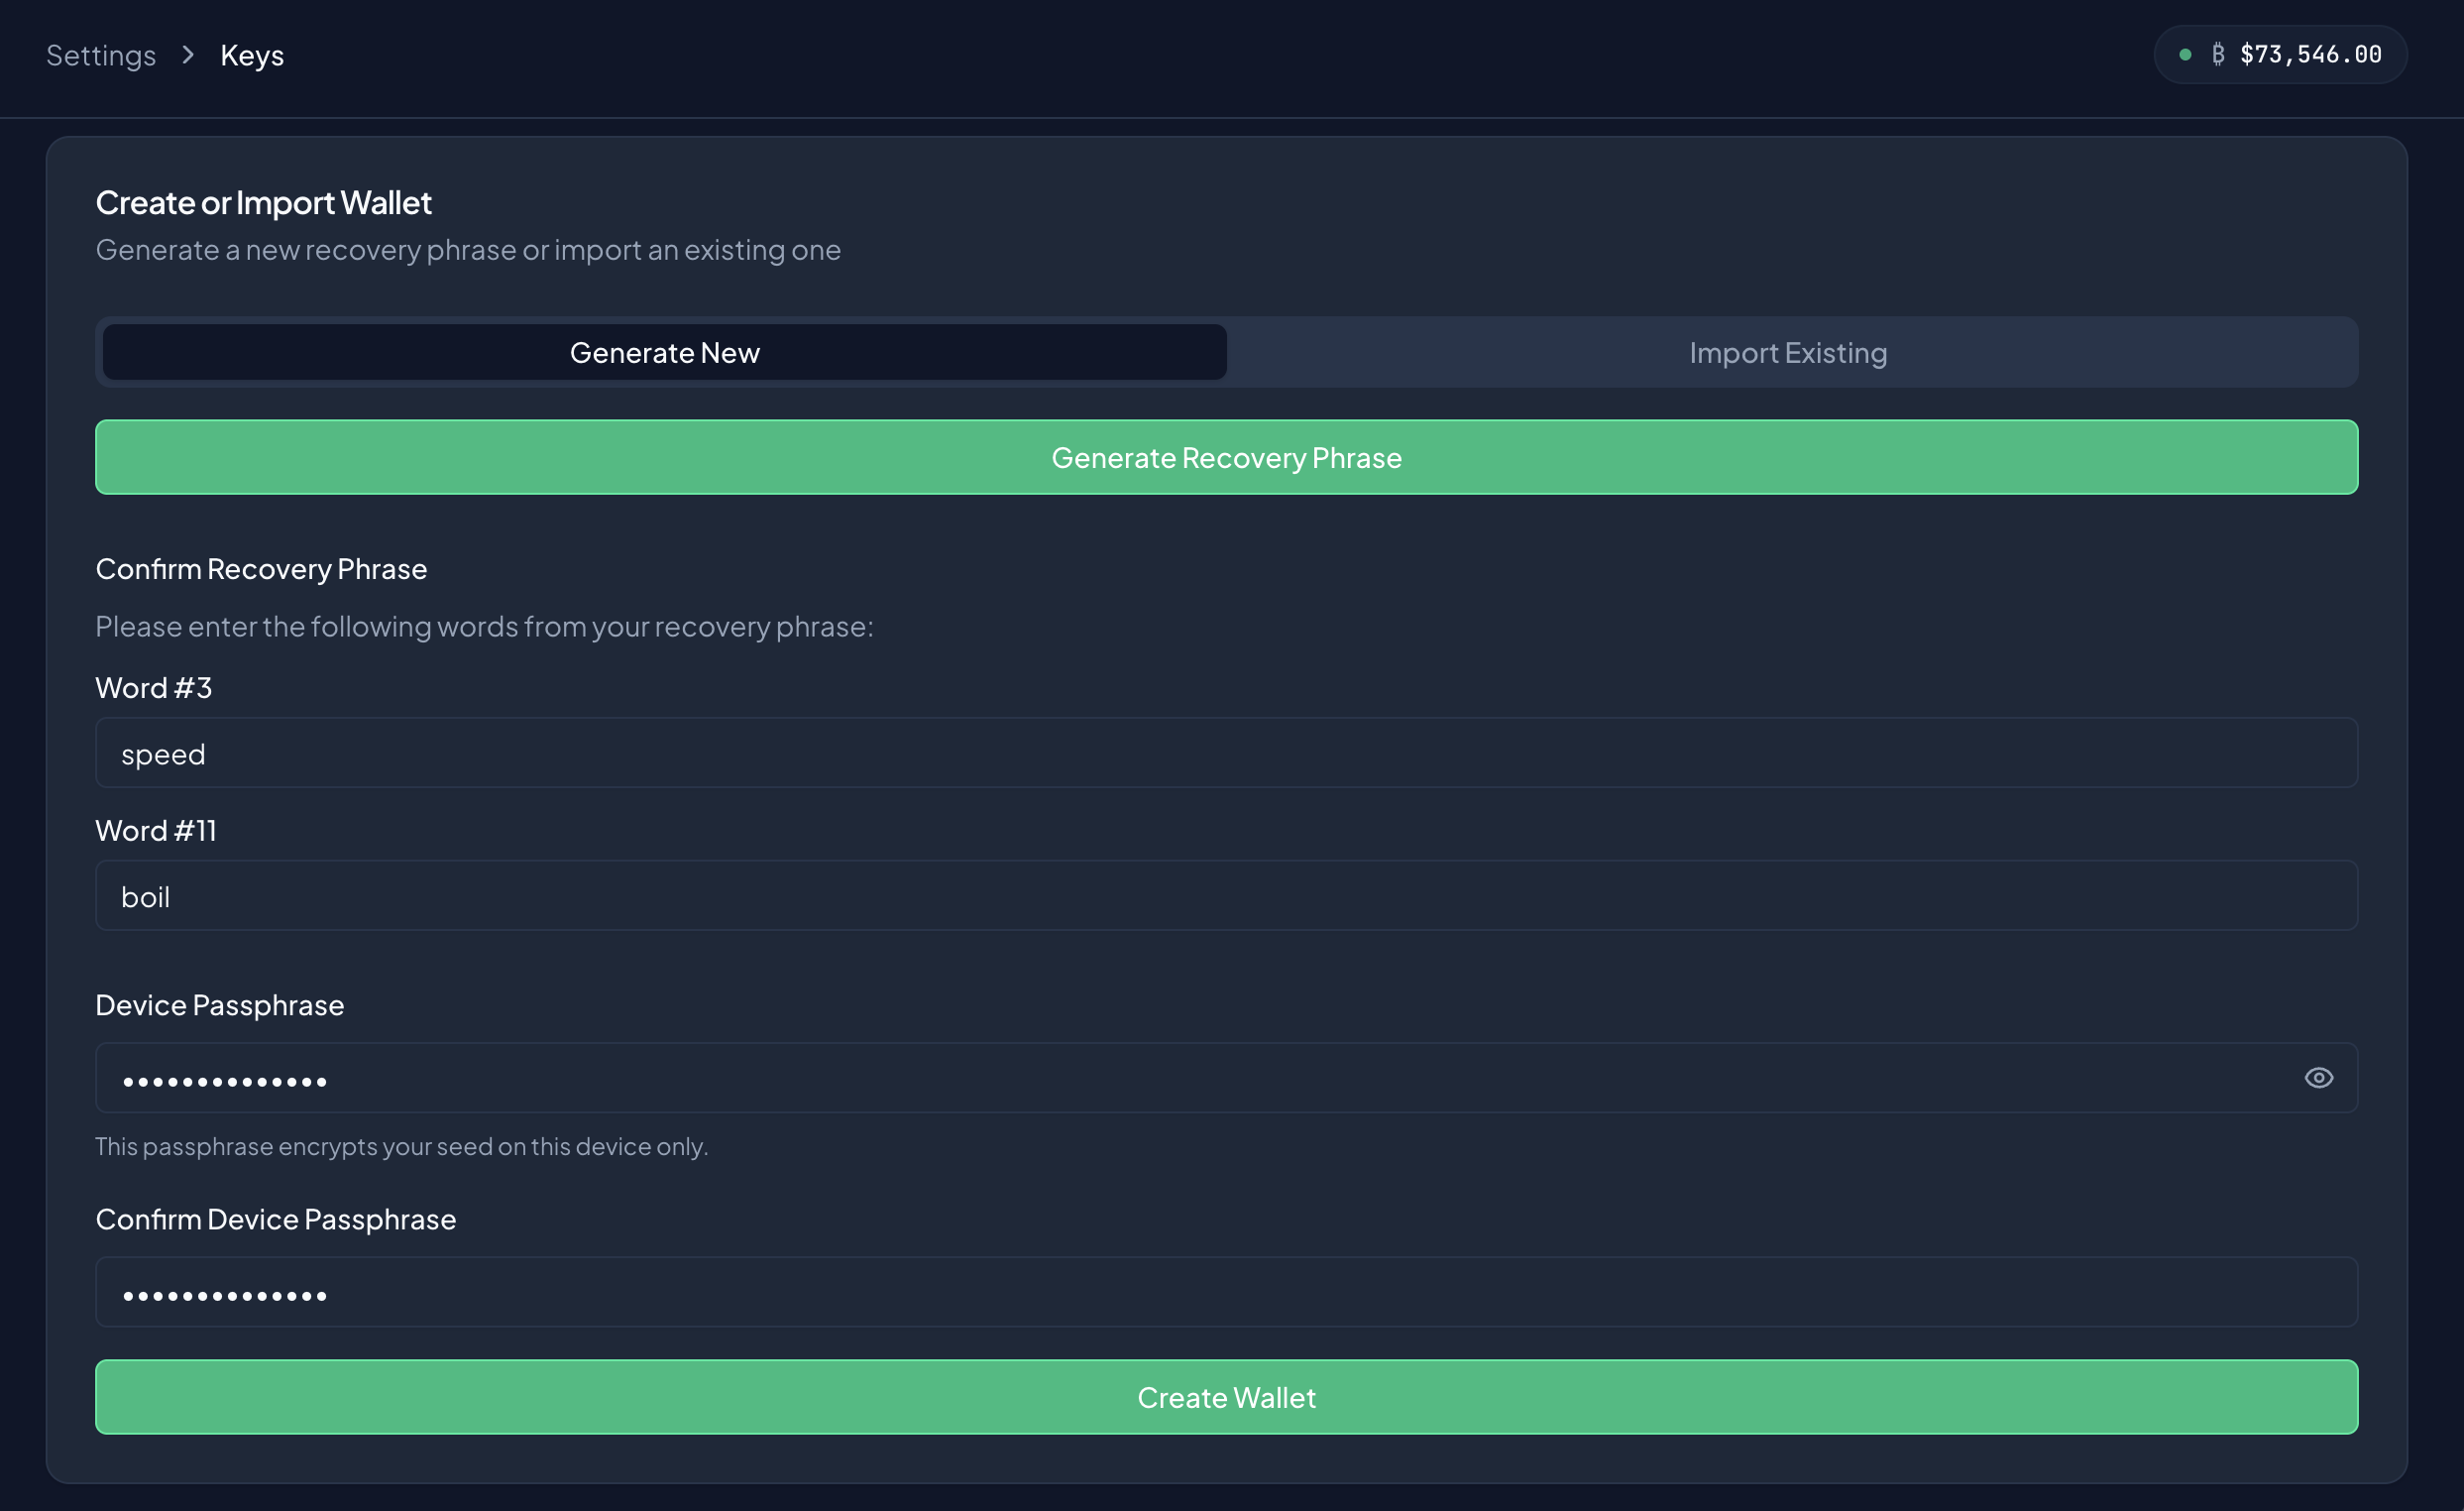
Choose something you'll remember, but keep it separate from your recovery phrase. A good passphrase is long and unique. You'll enter it again every time you unlock your wallet to sign.
Seed vs. passphrase — don't mix them up:The recovery phrase is your backup. Write it on paper. Never type it into anything but the import screen.The device passphrase is your day-to-day unlock password for this device. Remember it, but it can be different on every device.
Step 6: Create the wallet
Once your verification words match and both passphrase fields match, the Create Wallet button turns on. Click it.
Behind the scenes the app does a few things automatically:
- It derives two keys from your seed: an Operational Key (your everyday signing key) and a Backup Key (used for recovery branches of a deal).
- It encrypts your seed with your device passphrase and stores it only in this browser.
- It registers the public parts of your keys (never the seed) with Tetrapolar so your keys can be used in deals.
Step 7: Confirm everything is set
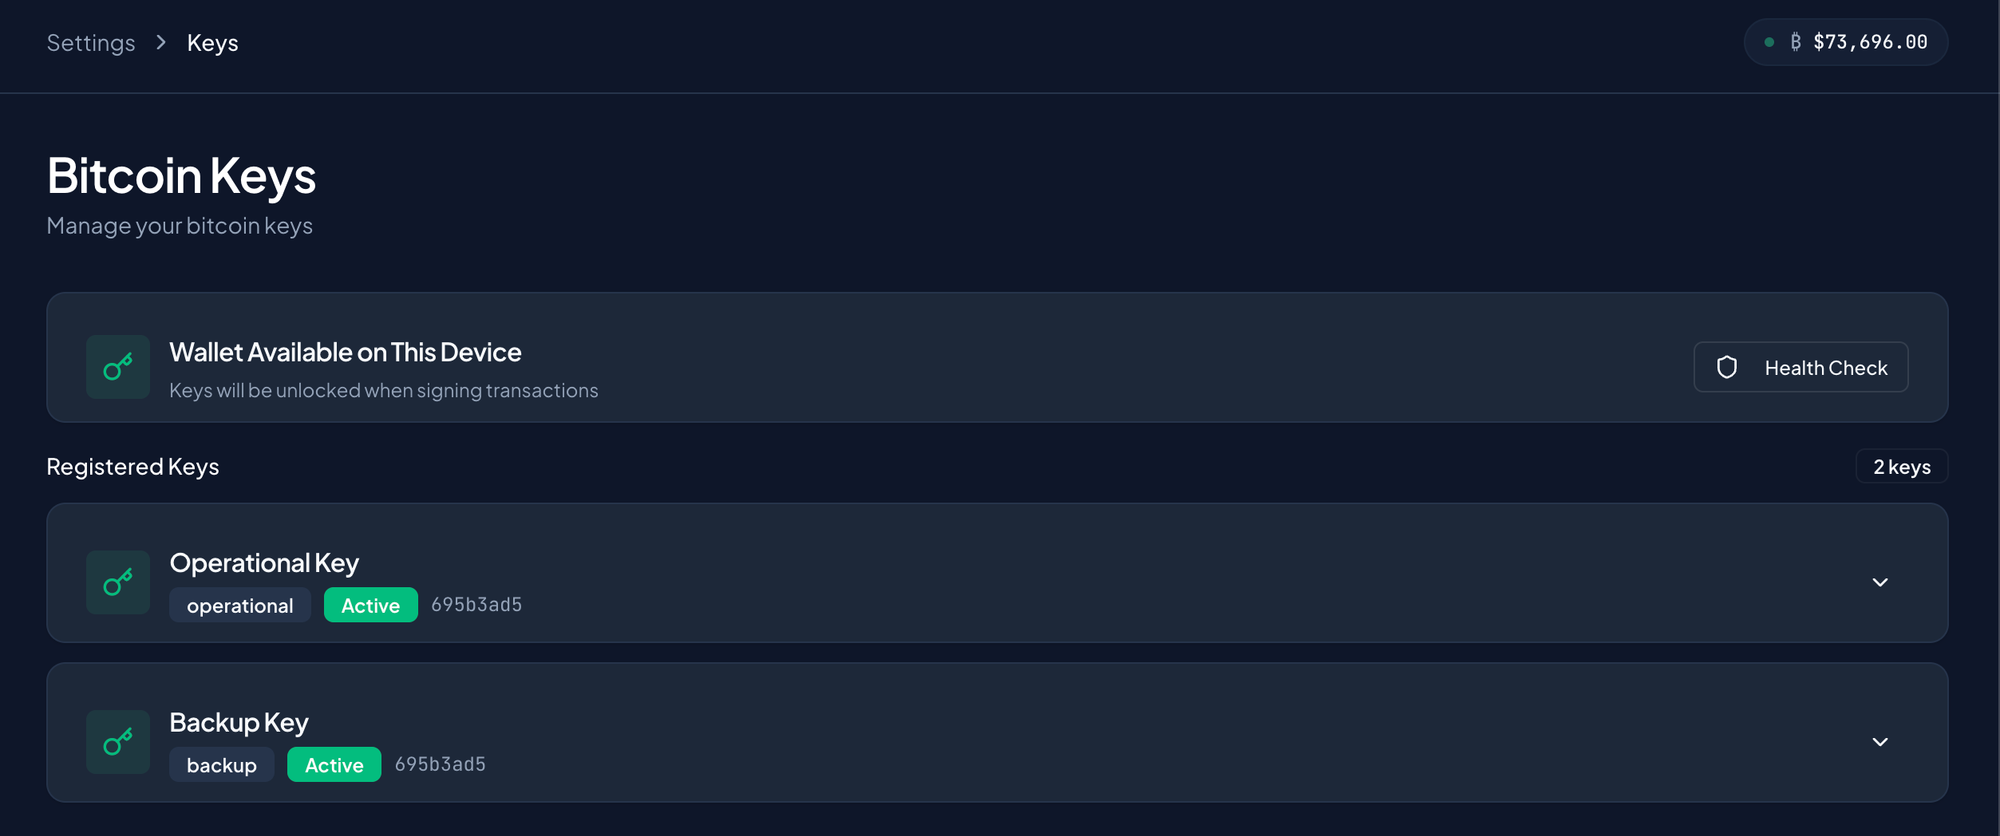
After creation you'll see your keys listed under Registered Keys — an Operational Key card and a Backup Key card. Each shows its fingerprint, and you can expand a card to view its derivation path and extended public key.
You'll also see a status card. It will say "Wallet Available on This Device", meaning your keys are saved here but locked. They unlock when you need to sign.
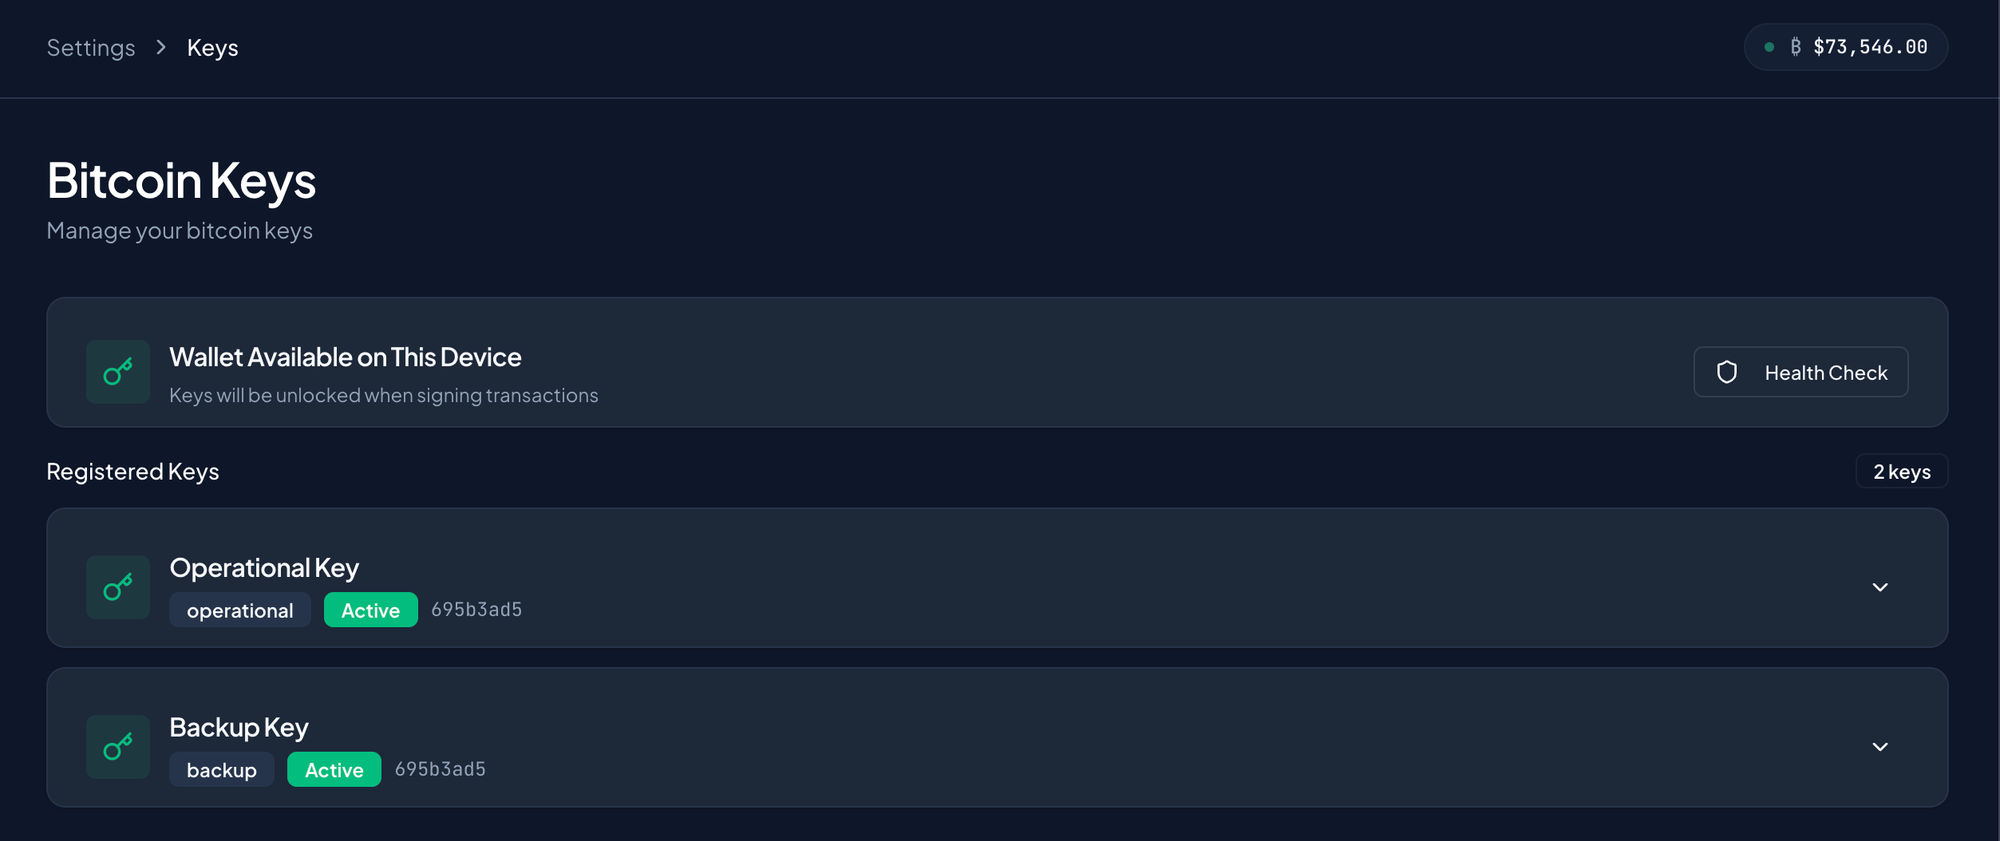
Your wallet stays locked until you sign. When a deal needs your signature, you'll be asked for your device passphrase to unlock. That's expected — it keeps your keys protected the rest of the time.
You're done. Your keys are created, backed up, and ready to use.
Part 2 — Recovering Your Keys (or Setting Up a New Device)
Use this when you log in on a new computer, a new browser, or after clearing your browser data. The information about your keys (but not the keys themselves) still exists on Tetrapolar's side — you just need to bring your seed back onto the device.
Step 1: Open the Bitcoin Keys page
Go to Settings → Bitcoin Keys. Because Tetrapolar sees that you already have registered keys but this device has no local copy, you'll see a notice prompting you to import, and the Import Existing tab will be selected for you.
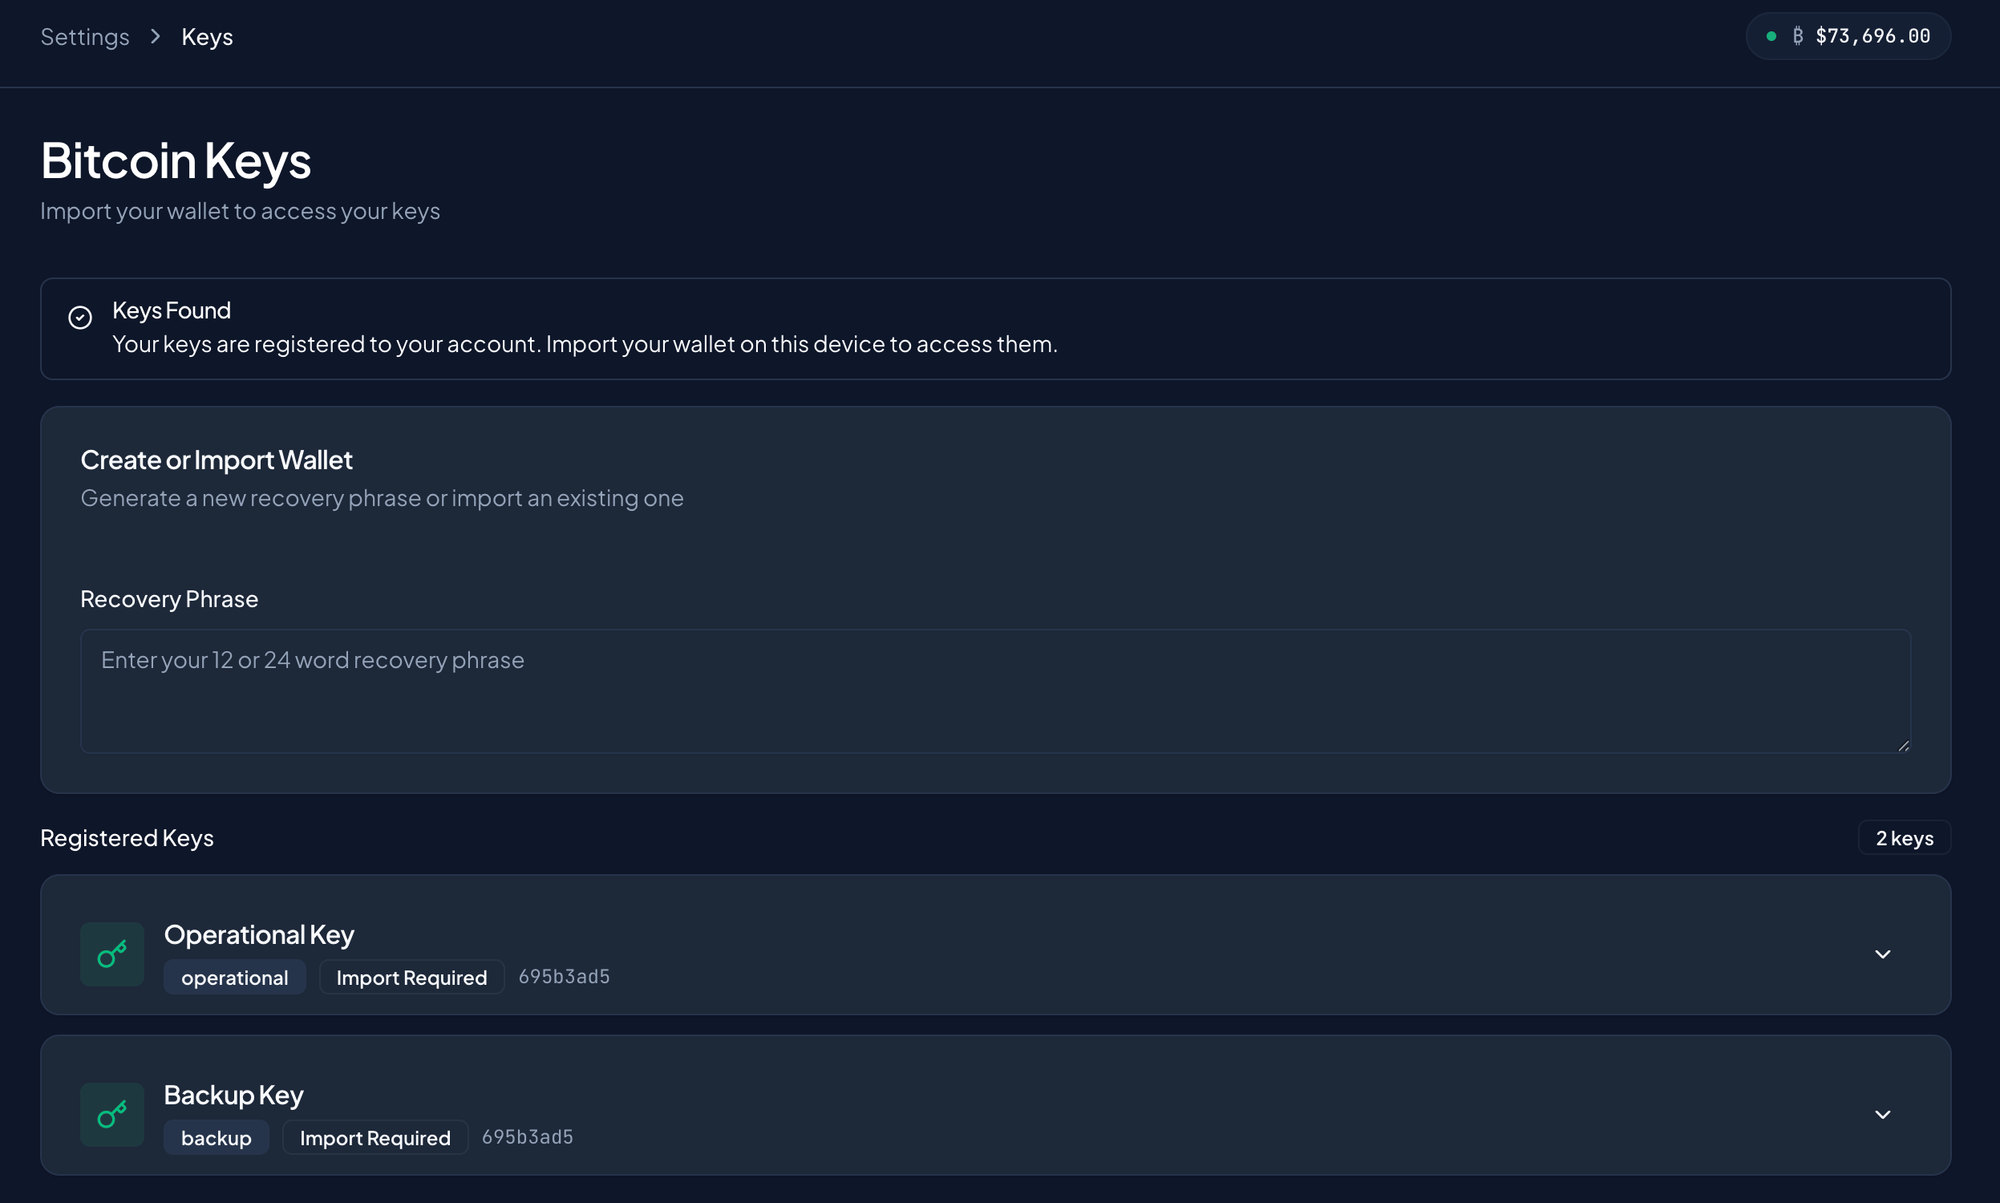
Step 2: Enter your recovery phrase
In the Recovery Phrase box ("Enter your 12 or 24 word recovery phrase"), type your 12 words in order, separated by spaces.
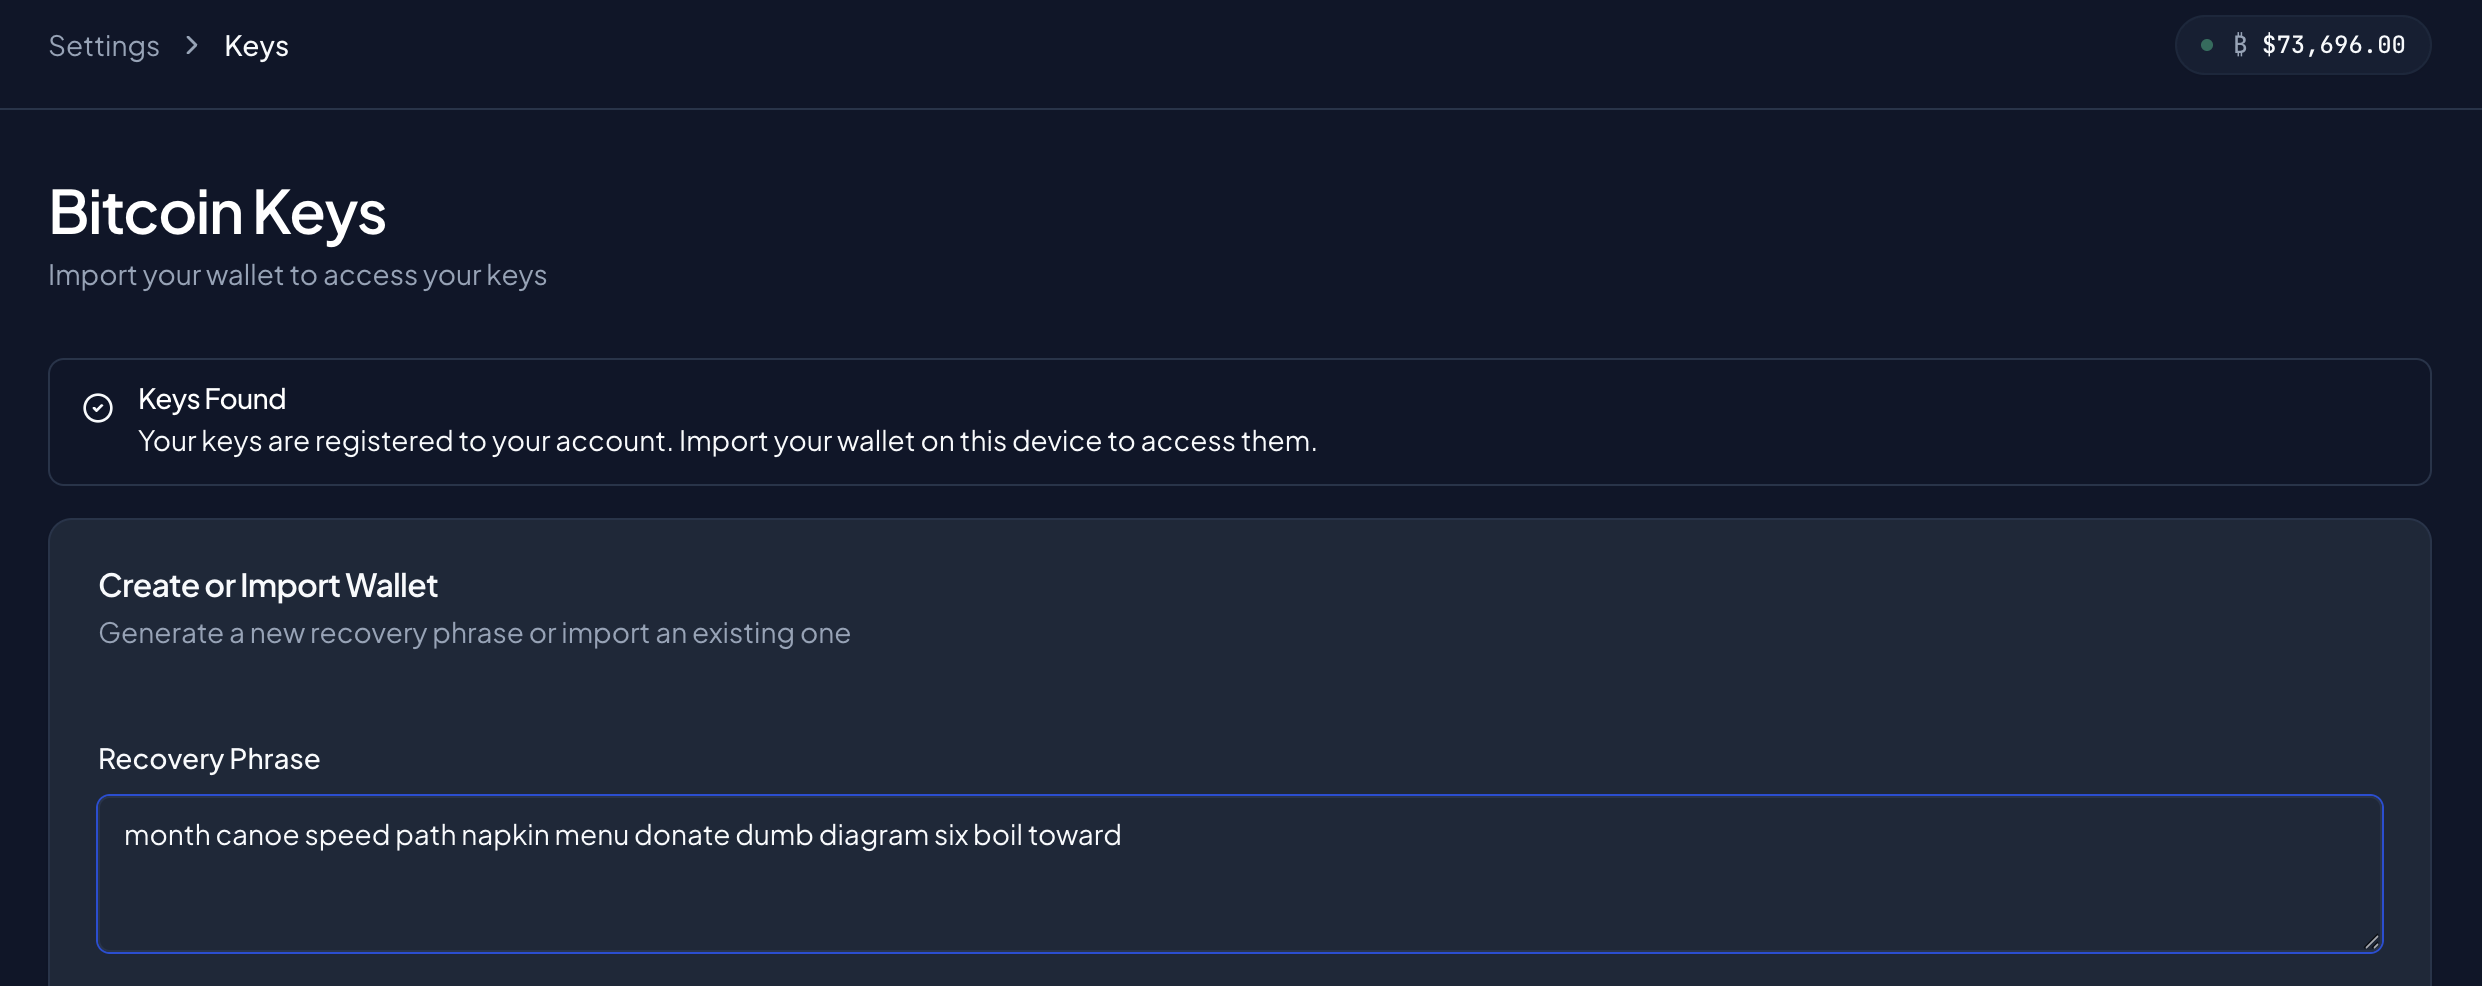
Type carefully and check the order. The words must be exact and in the right sequence. This is the only screen where you should ever enter your recovery phrase.
Step 3: Set a device passphrase for this device
Enter a Device Passphrase and confirm it, just like during setup.
This can be a brand-new passphrase. The device passphrase is per-device. You don't have to reuse the one from your other computer — pick whatever you'll remember on this device.
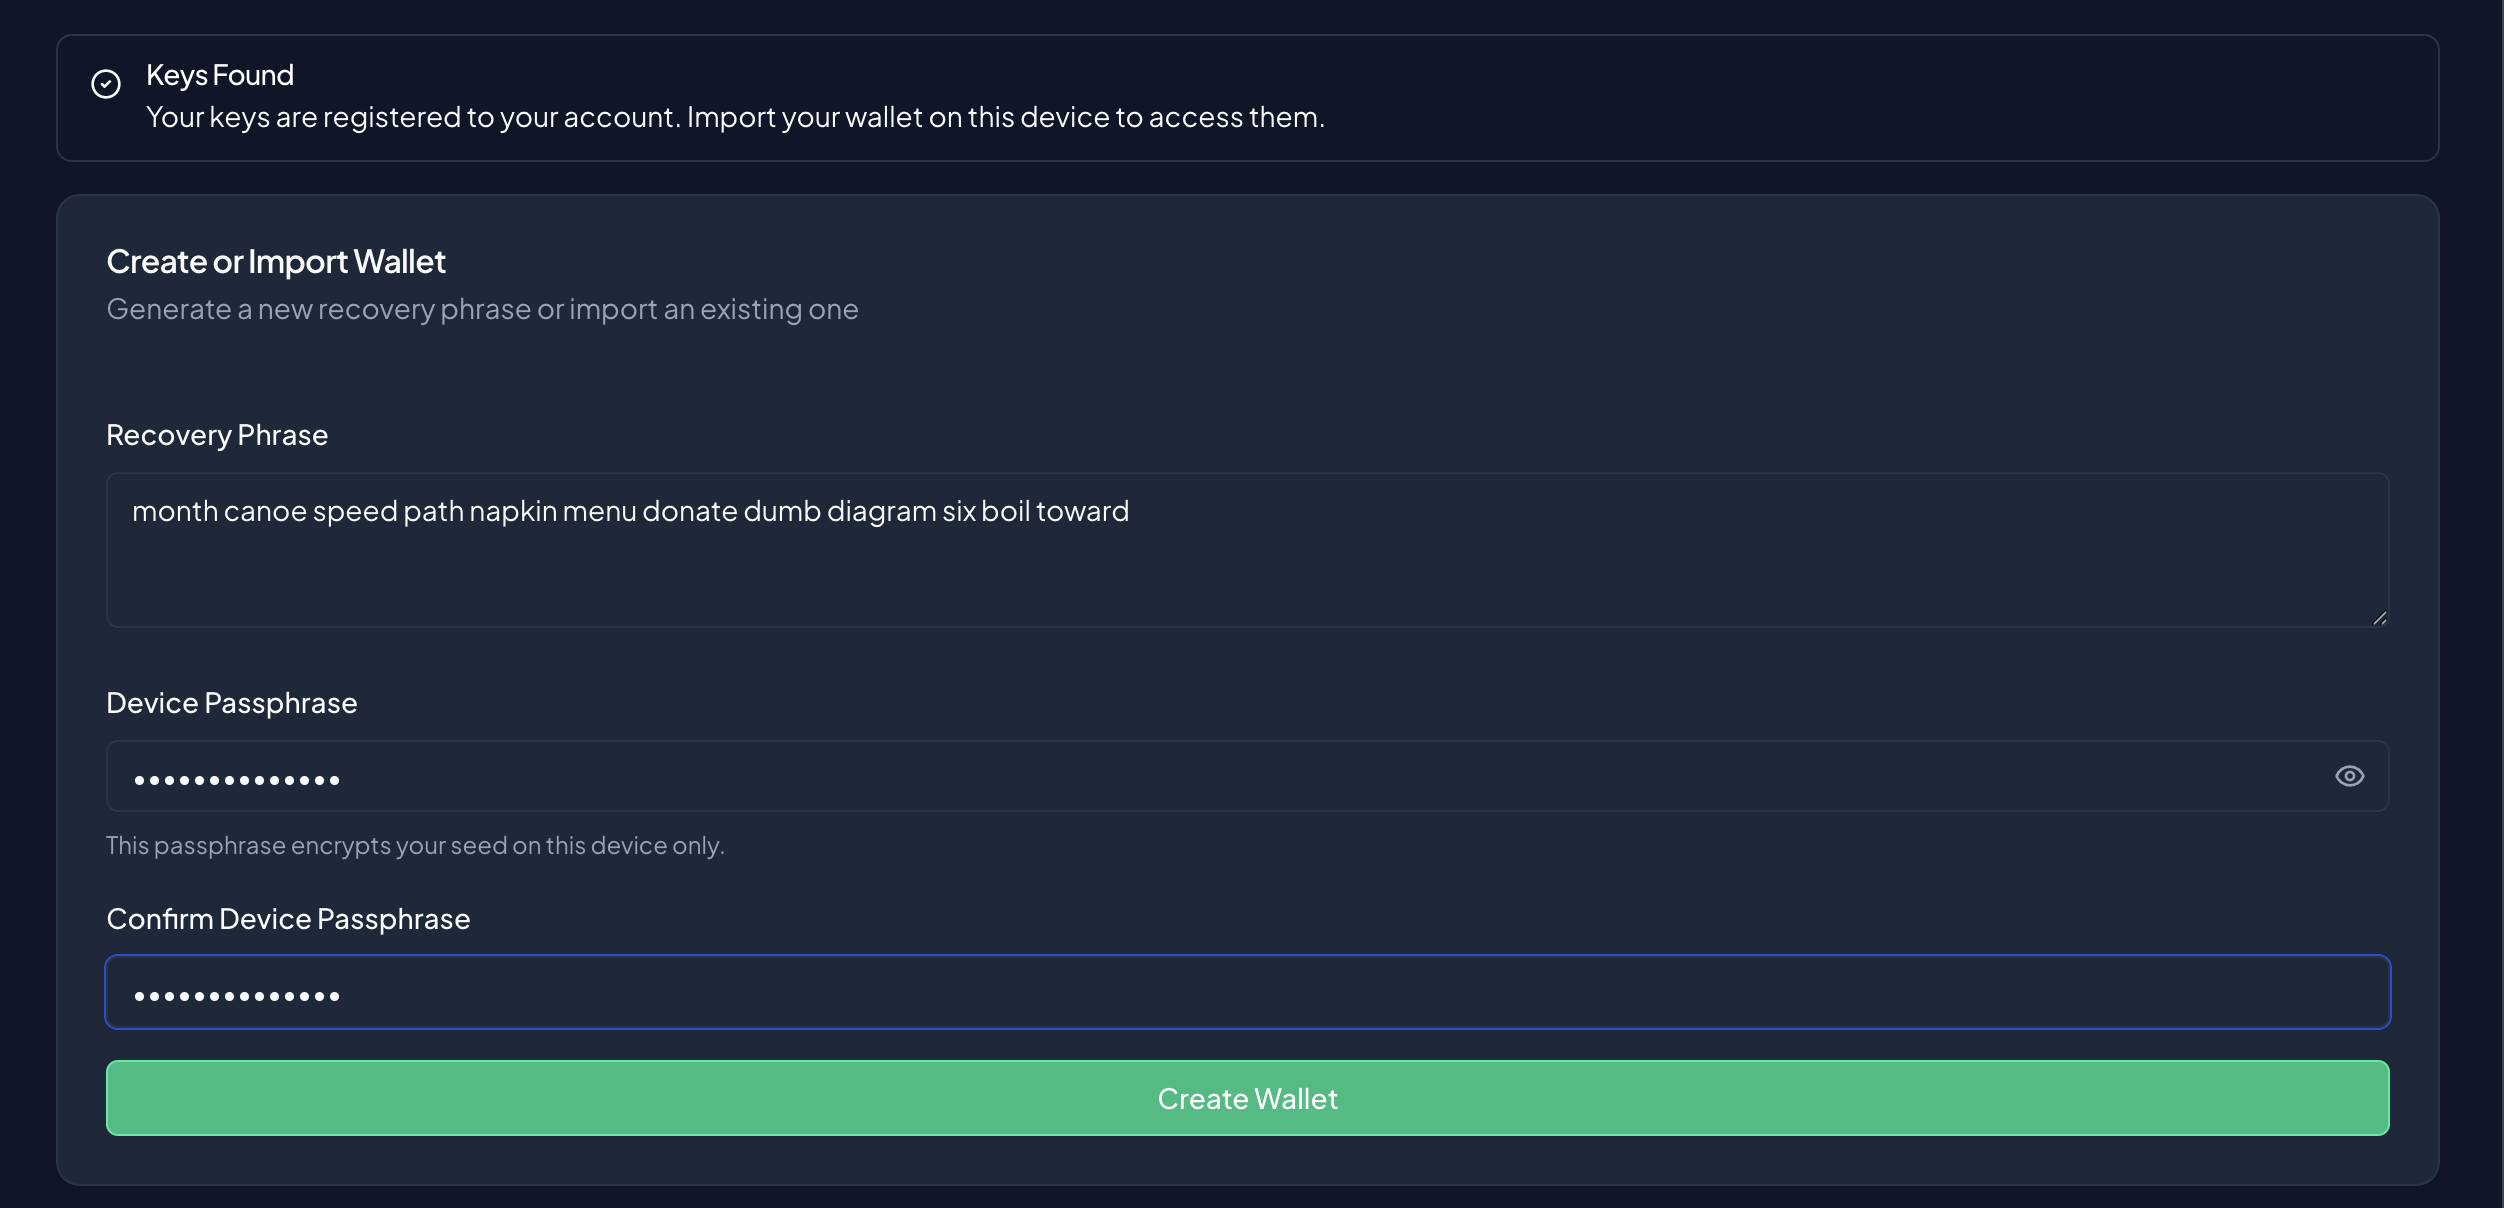
Step 4: Import
Click Create Wallet.
The app rebuilds your keys from the phrase and checks them against the keys already registered to your account:
- If they match, your wallet is restored and you'll see your Operational and Backup keys listed, ready to use.
- If they don't match, you'll see: "The recovery phrase does not match your registered keys." This almost always means a typo or wrong word order — re-check your phrase and try again.
That's it. You're ready to go.
The Health Check Button
On the Bitcoin Keys page, your wallet status card has a Health Check button. Use it any time you want to confirm — without signing anything — that your wallet is stored correctly on this device and that you still remember your device passphrase.
This is a safe, read-only test. It's a good habit to run it after importing your wallet on a new device, or every so often just to make sure your passphrase still works.
How to use it
- Click Health Check.
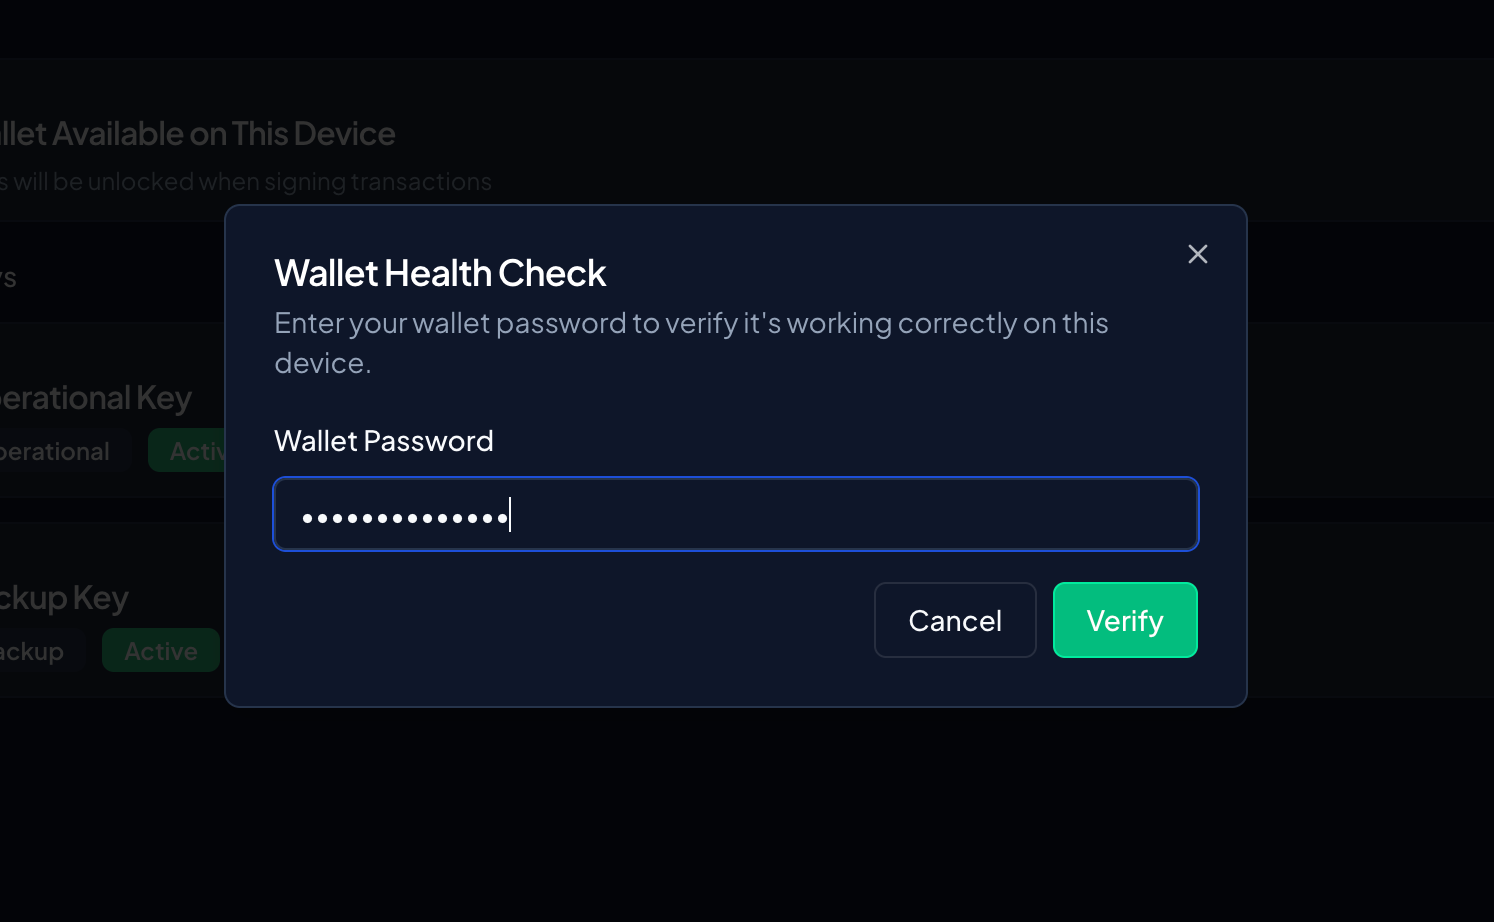
- A dialog opens titled "Wallet Health Check": "Enter your wallet password to verify it's working correctly on this device."
- Enter your Wallet Password (your device passphrase) and click Verify.
What it actually does
The app loads the encrypted seed stored in this browser and tries to decrypt it with the password you entered. If the password is correct and the stored data is intact, the check passes — and the seed is immediately wiped from memory again. It does not unlock your wallet or expose your keys; it only verifies that everything is in order.
- If it passes: you'll see a green checkmark with "Your wallet is healthy and your password is correct," plus a confirmation that your wallet is working correctly on this device. Click Done to close.
- If it fails: you'll see an error. The most common cause is a mistyped or wrong passphrase. If your password is definitely correct but it still fails, your stored wallet may be missing or corrupted on this device — re-import it using your recovery phrase (see Part 2).
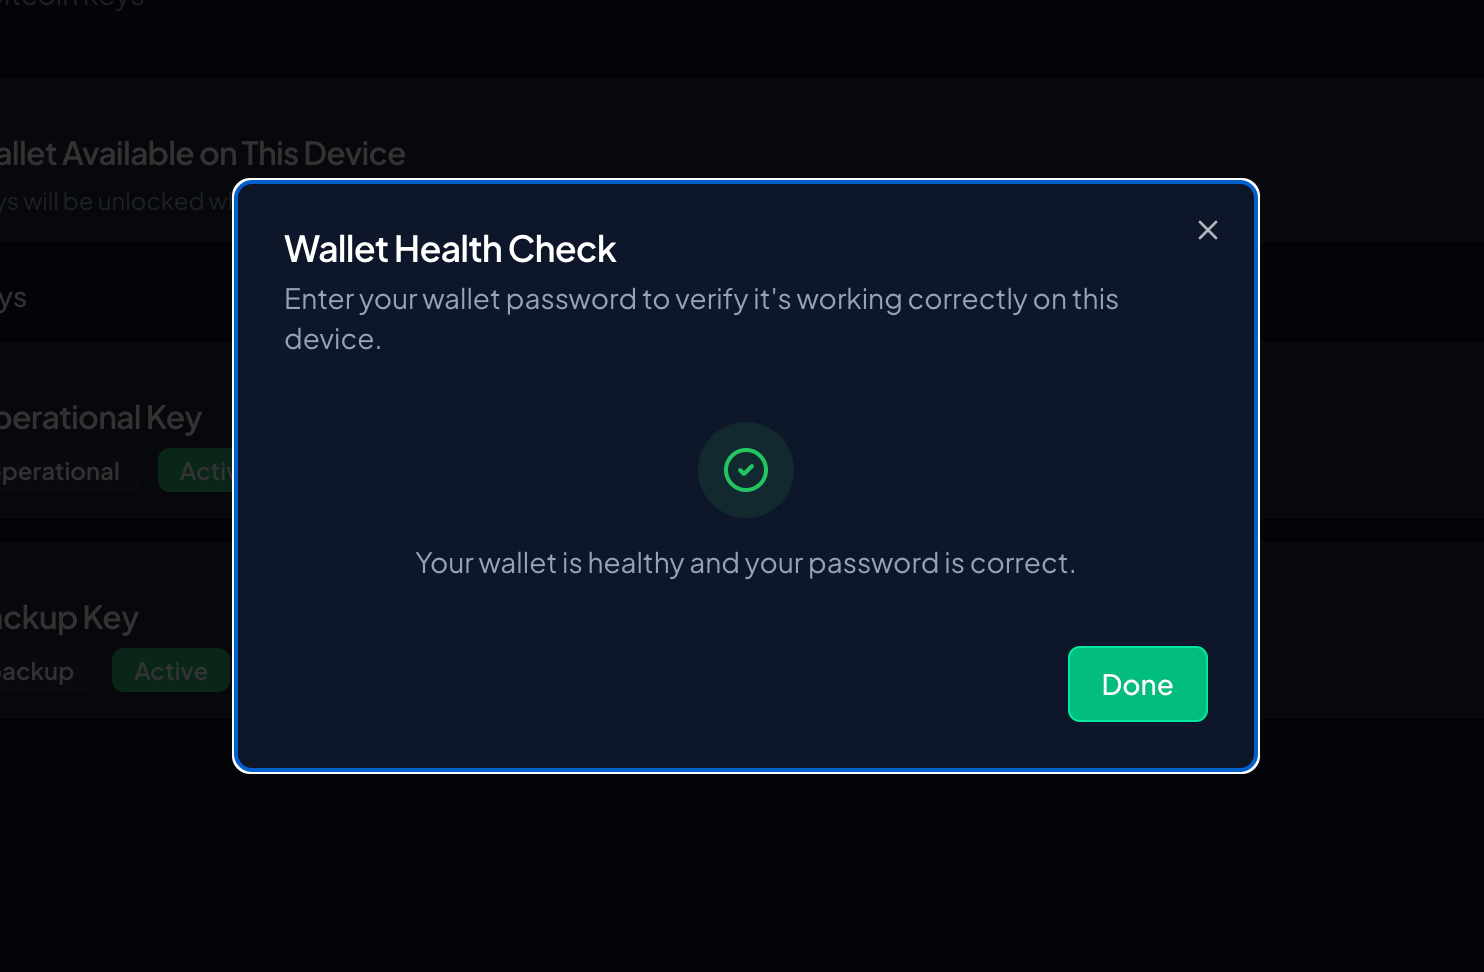
Health Check vs. signing: A passing health check confirms your passphrase and stored seed are good. It does not keep your wallet unlocked — you'll still enter your passphrase when you actually sign.
If You See "Wrong Wallet Detected"
If someone else previously imported their wallet in this same browser, you may see a "Wrong Wallet Detected" dialog. It means the wallet stored in this browser belongs to a different user and doesn't match your registered keys.
To fix it, click Clear & Import My Wallet. This removes the other wallet from the browser and lets you import your own recovery phrase as described in Part 2.
Quick Reminders
- Recovery phrase = your backup. 12 words on paper. Never digital, never shared. Losing it means losing your keys.
- Device passphrase = your unlock. Protects your seed on one device. Can differ per device. Forgetting it just means re-importing with your phrase.
- Your wallet stays locked until you unlock it to sign — that's normal.
- Only ever type your recovery phrase on the Import screen. Nowhere else, ever.
Update: Liquid Keys for USDT Deals
Tetrapolar now supports USDT escrow on the Liquid Network, alongside bitcoin. To make this work, your wallet needs a second set of keys for Liquid — and the good news is there's nothing new to back up.
Your Liquid keys come from the same recovery phrase. They're derived from the very same 12 words you wrote down when you set up your wallet. You don't need a new seed, a new passphrase, or a second backup. The same recovery phrase rebuilds both your Bitcoin keys and your Liquid keys.
New wallets
If you're creating or importing your wallet now, there's nothing extra to do. Your Bitcoin keys and your Liquid keys are generated and registered together, automatically, from the one recovery phrase.
Existing users
If you set up your keys before Liquid support existed, you'll need to register your Liquid keys once before you can take part in USDT deals. In most cases this happens quietly in the background the next time you unlock your wallet — but if it doesn't, you'll see a prompt.
On your Dashboard and on the Bitcoin Keys page, look for a notice titled "Liquid Keys Missing":
Your Liquid keys are not registered. Without them, you cannot participate in USDT deals on the Liquid Network.
Click Register Liquid Keys. You'll be asked for your device passphrase to unlock your wallet, the app derives your Liquid keys from your existing seed, and registers them. When it's done you'll see a confirmation that your wallet now supports the Liquid Network.
You'll also be reminded when starting a USDT deal. If you try to create a deal in Tether (USDT · Liquid) before your Liquid keys are registered, Tetrapolar blocks the deal with a "Wallet Setup Required" message and a link to finish setting up your keys. Register them once and you're set for every future USDT deal.
Same seed, same rule. Because your Liquid keys come from your existing recovery phrase, your backup hasn't changed — those 12 words still recover everything. There's no new phrase to write down.