Tutorial: How to Complete a Bitcoin Escrow Deal (Buyer's Guide)
A step-by-step walkthrough of a USD-priced bitcoin deal from the buyer's side — creating the deal, funding the multisig escrow, and releasing funds to the seller once you're satisfied.

A deal in Tetrapolar is an escrow: your bitcoin/USDT is locked in a shared multisig wallet that neither side controls alone, and it only moves when both you and your counterparty agree. This guide walks you through a complete deal from the buyer's side — creating it, funding the escrow, and releasing the funds to the seller once you've received what you paid for.
This walkthrough follows a BTC deal priced in USD. You agree on a dollar amount, and Tetrapolar works out how much bitcoin that is at the current rate when you fund.
Before you start, it helps to know a few terms:
- Counterparty: The other person in the deal. In this guide, that's the seller — the one delivering the goods or service.
- Escrow (the multisig wallet): A shared wallet that holds the bitcoin during the deal. Funds can't move unless both parties sign.
- Refund address: A bitcoin address you control. If the deal is refunded, the escrow pays back to here.
- Payout address: The seller's bitcoin address. If the deal is released, the escrow pays out to there.
You need your wallet keys before you start. Signing to release or refund a deal requires the keys you set up on the Bitcoin Keys page. If you haven't created them yet, do that first.
Part 1 — Creating the Deal
Step 1: Open the new deal form
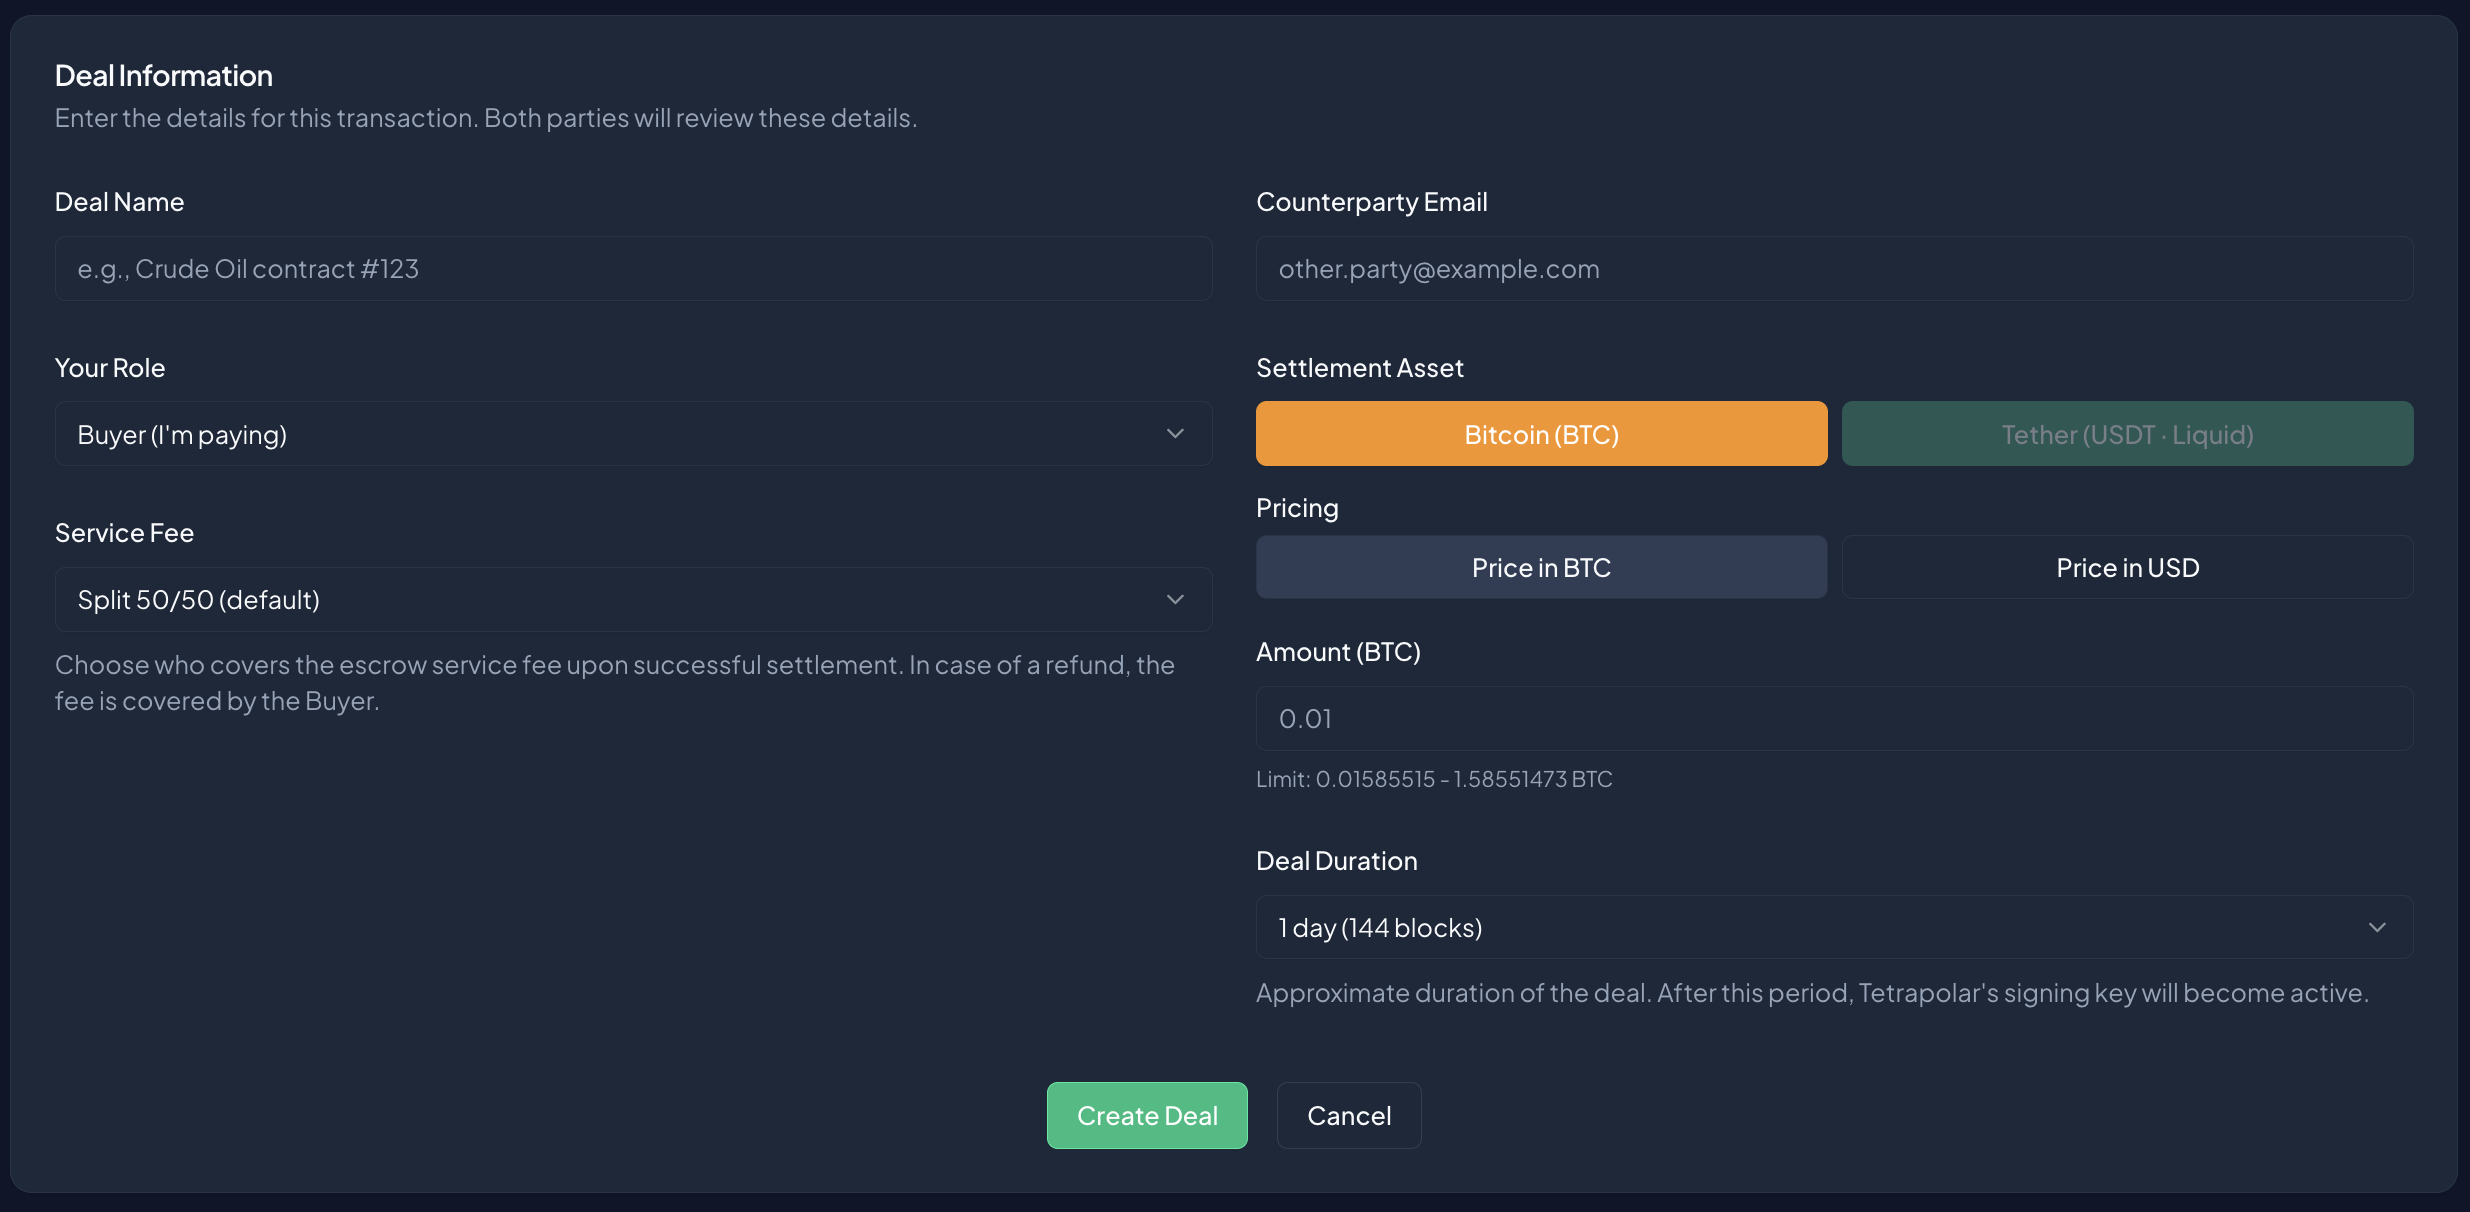
From the Deals page, click New Deal. You'll land on the Create New Deal form, inside a card titled Deal Information.
Step 2: Fill in the deal details
Work down the form:
- Deal Name — a label so you can recognise the deal later (e.g. "Crude oil contract #123").
- Your Role — select Buyer (I'm paying).
- Service Fee — choose who covers the escrow fee: Split 50/50 (default), Seller pays, or Buyer pays.
- Counterparty Email — the seller's email address.
Step 3: Set the amount and pricing
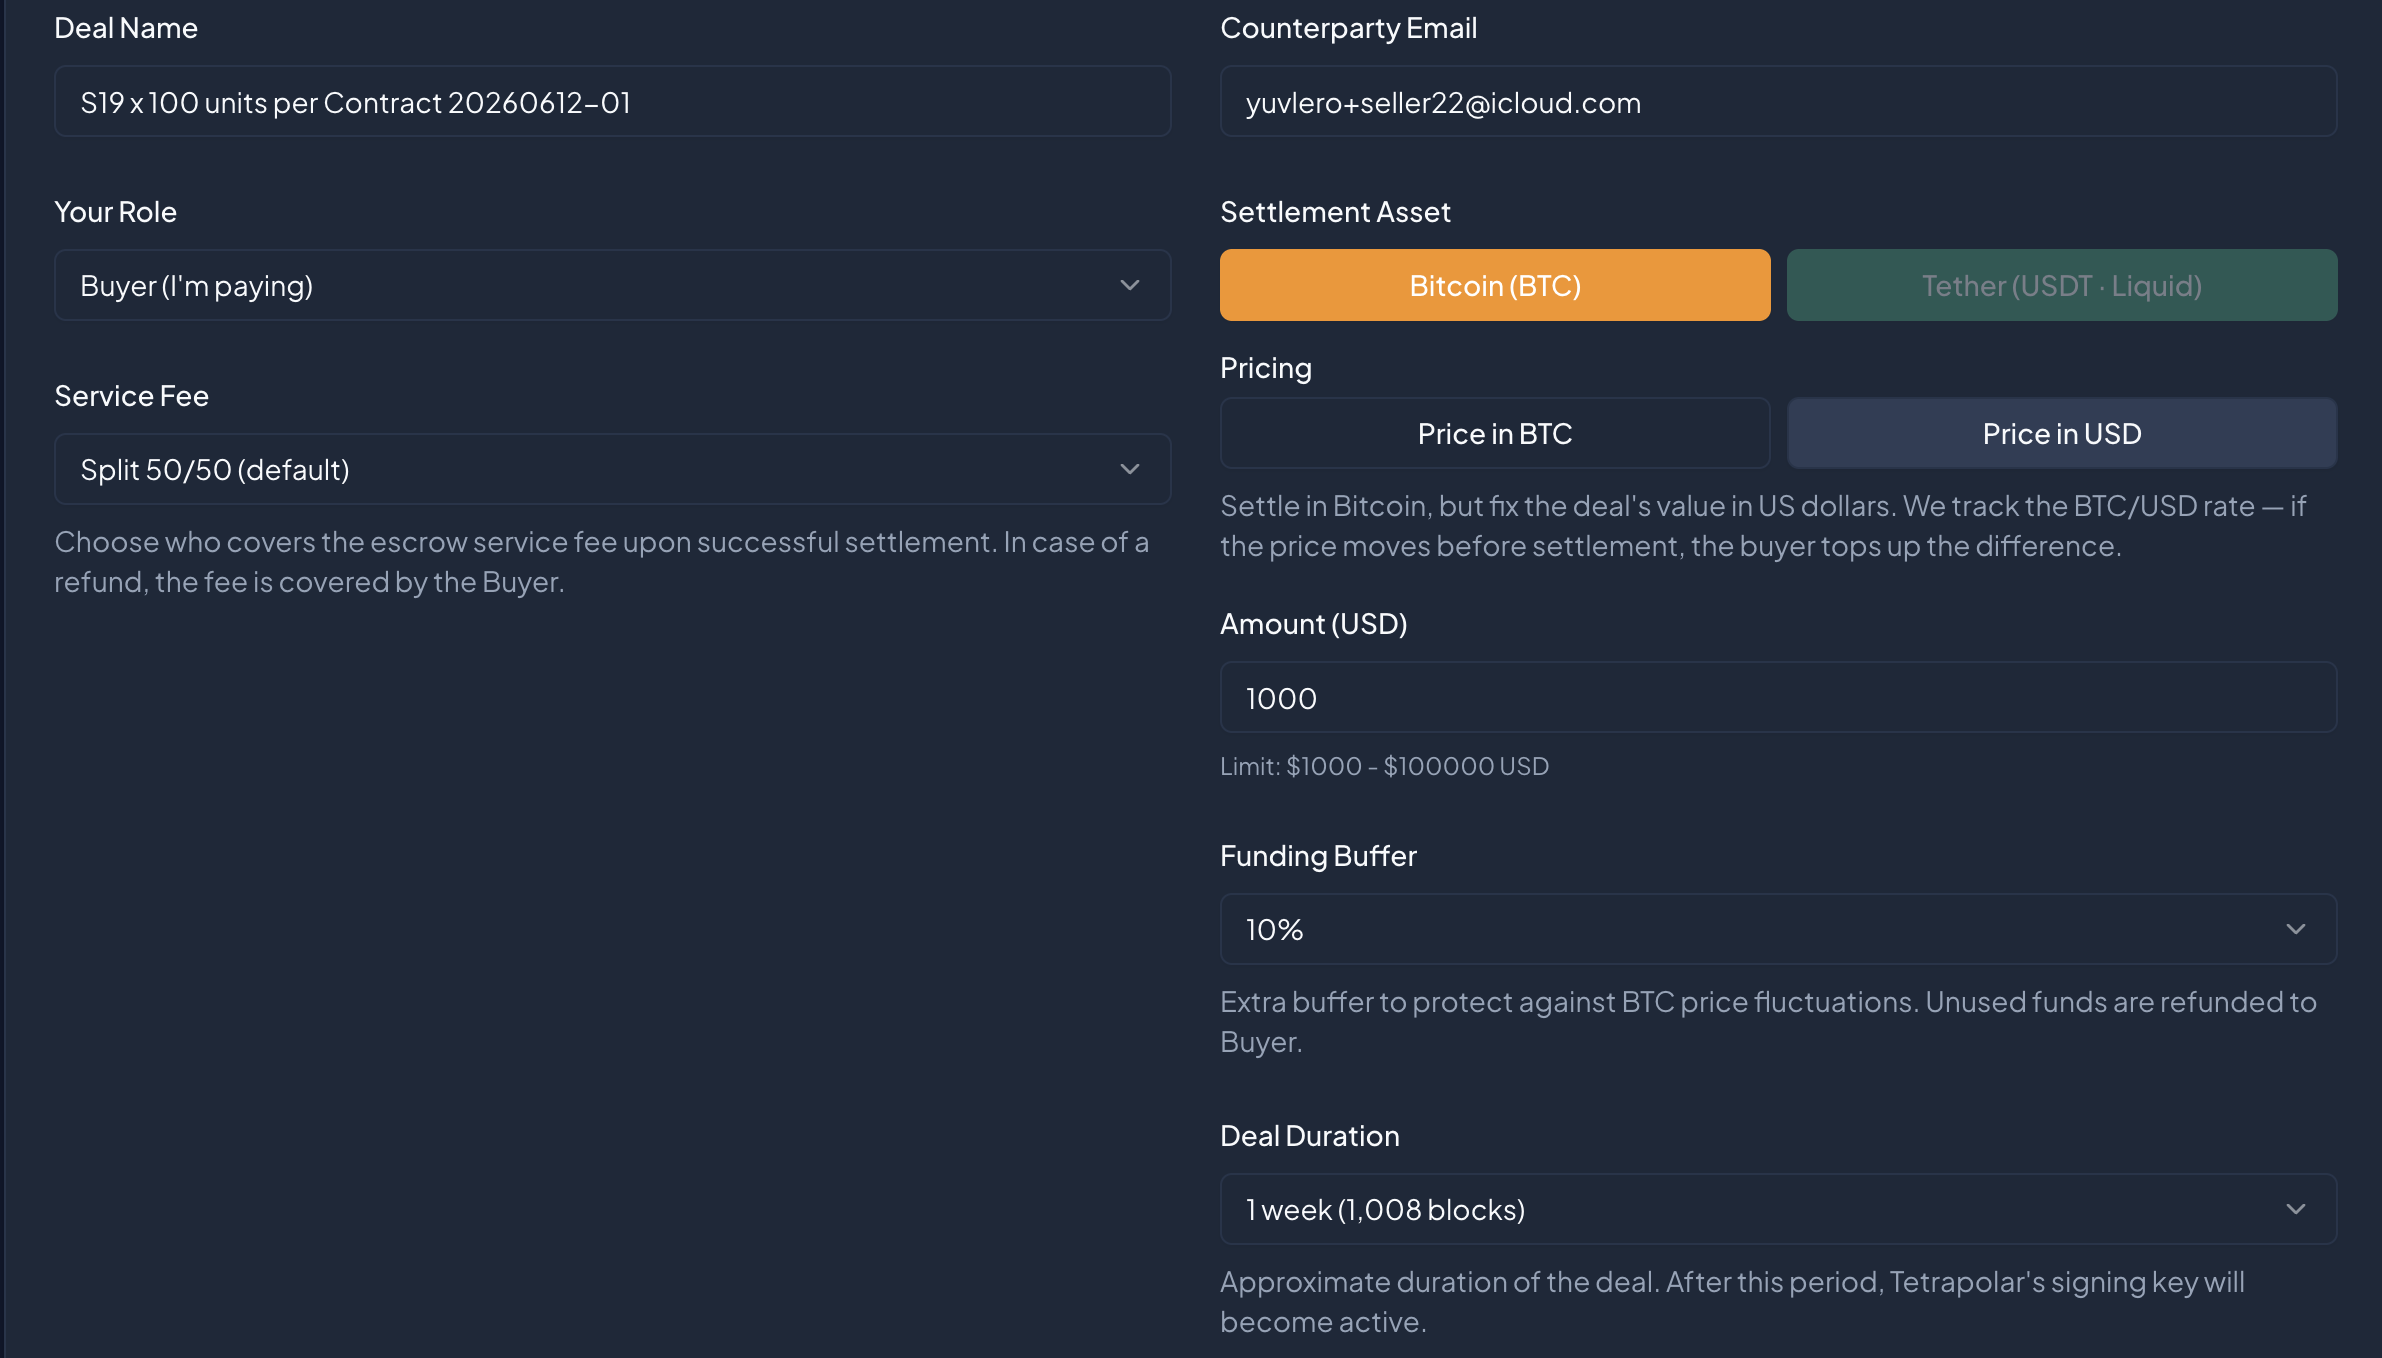
- Settlement Asset — select Bitcoin (BTC).
- Pricing — choose Price in USD. This is what makes the deal USD‑denominated.
- Amount (USD) — enter the dollar value of the deal.
- Funding Buffer — a dropdown (10%–50%) that only appears for USD‑priced deals. Because the BTC/USD rate moves, you fund slightly more than the exact dollar amount so the escrow still covers the agreed value if the price dips. Anything not needed comes back to you at the end.
Step 4: Choose the duration and create
- Transaction Duration — how long the deal's timelock runs (e.g. 1 day (144 blocks)).
When everything looks right, click Create Deal.
What the buffer is for: On a USD‑priced deal you're agreeing on dollars, not a fixed number of sats. The buffer protects the deal against the bitcoin price dropping between now and when you settle. You only ever spend what the deal needs — the rest is returned.
Part 2 — Agreeing on Addresses
Step 5: Wait for the seller to accept
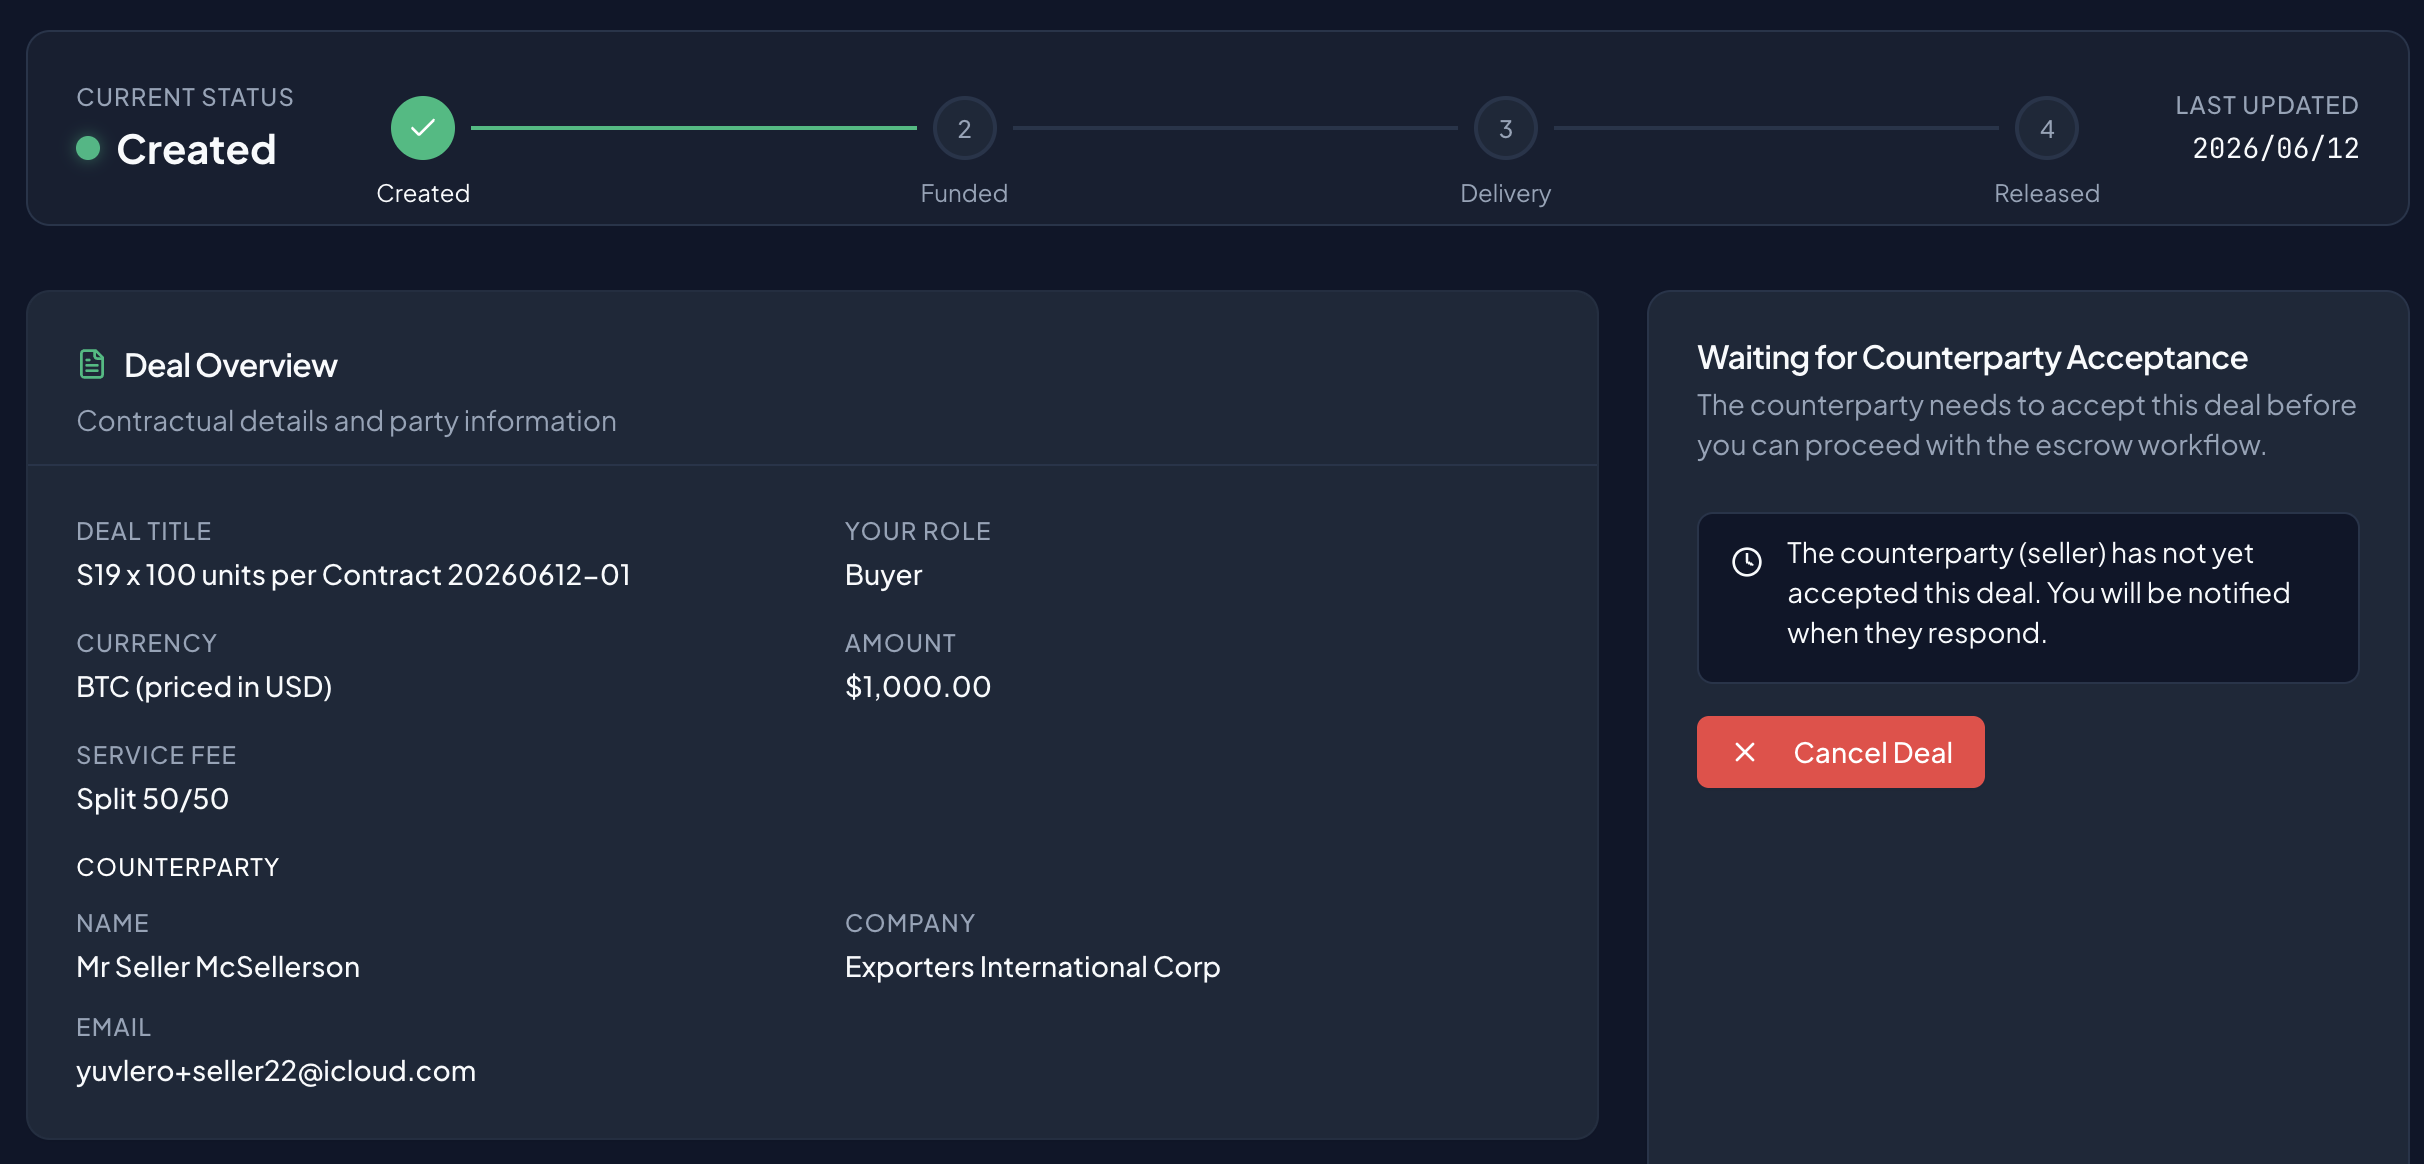
Right after you create the deal, it sits in a Waiting for Counterparty Acceptance state. The seller gets a prompt to Accept or Reject. Once they accept, the deal moves forward automatically — no action needed from you.
Step 6: Submit your refund address
Now both sides provide their addresses. You'll see a card titled Refund Address.
Enter a bitcoin address you control — this is where the escrow returns funds if the deal is ever refunded — and click Submit Refund Address.
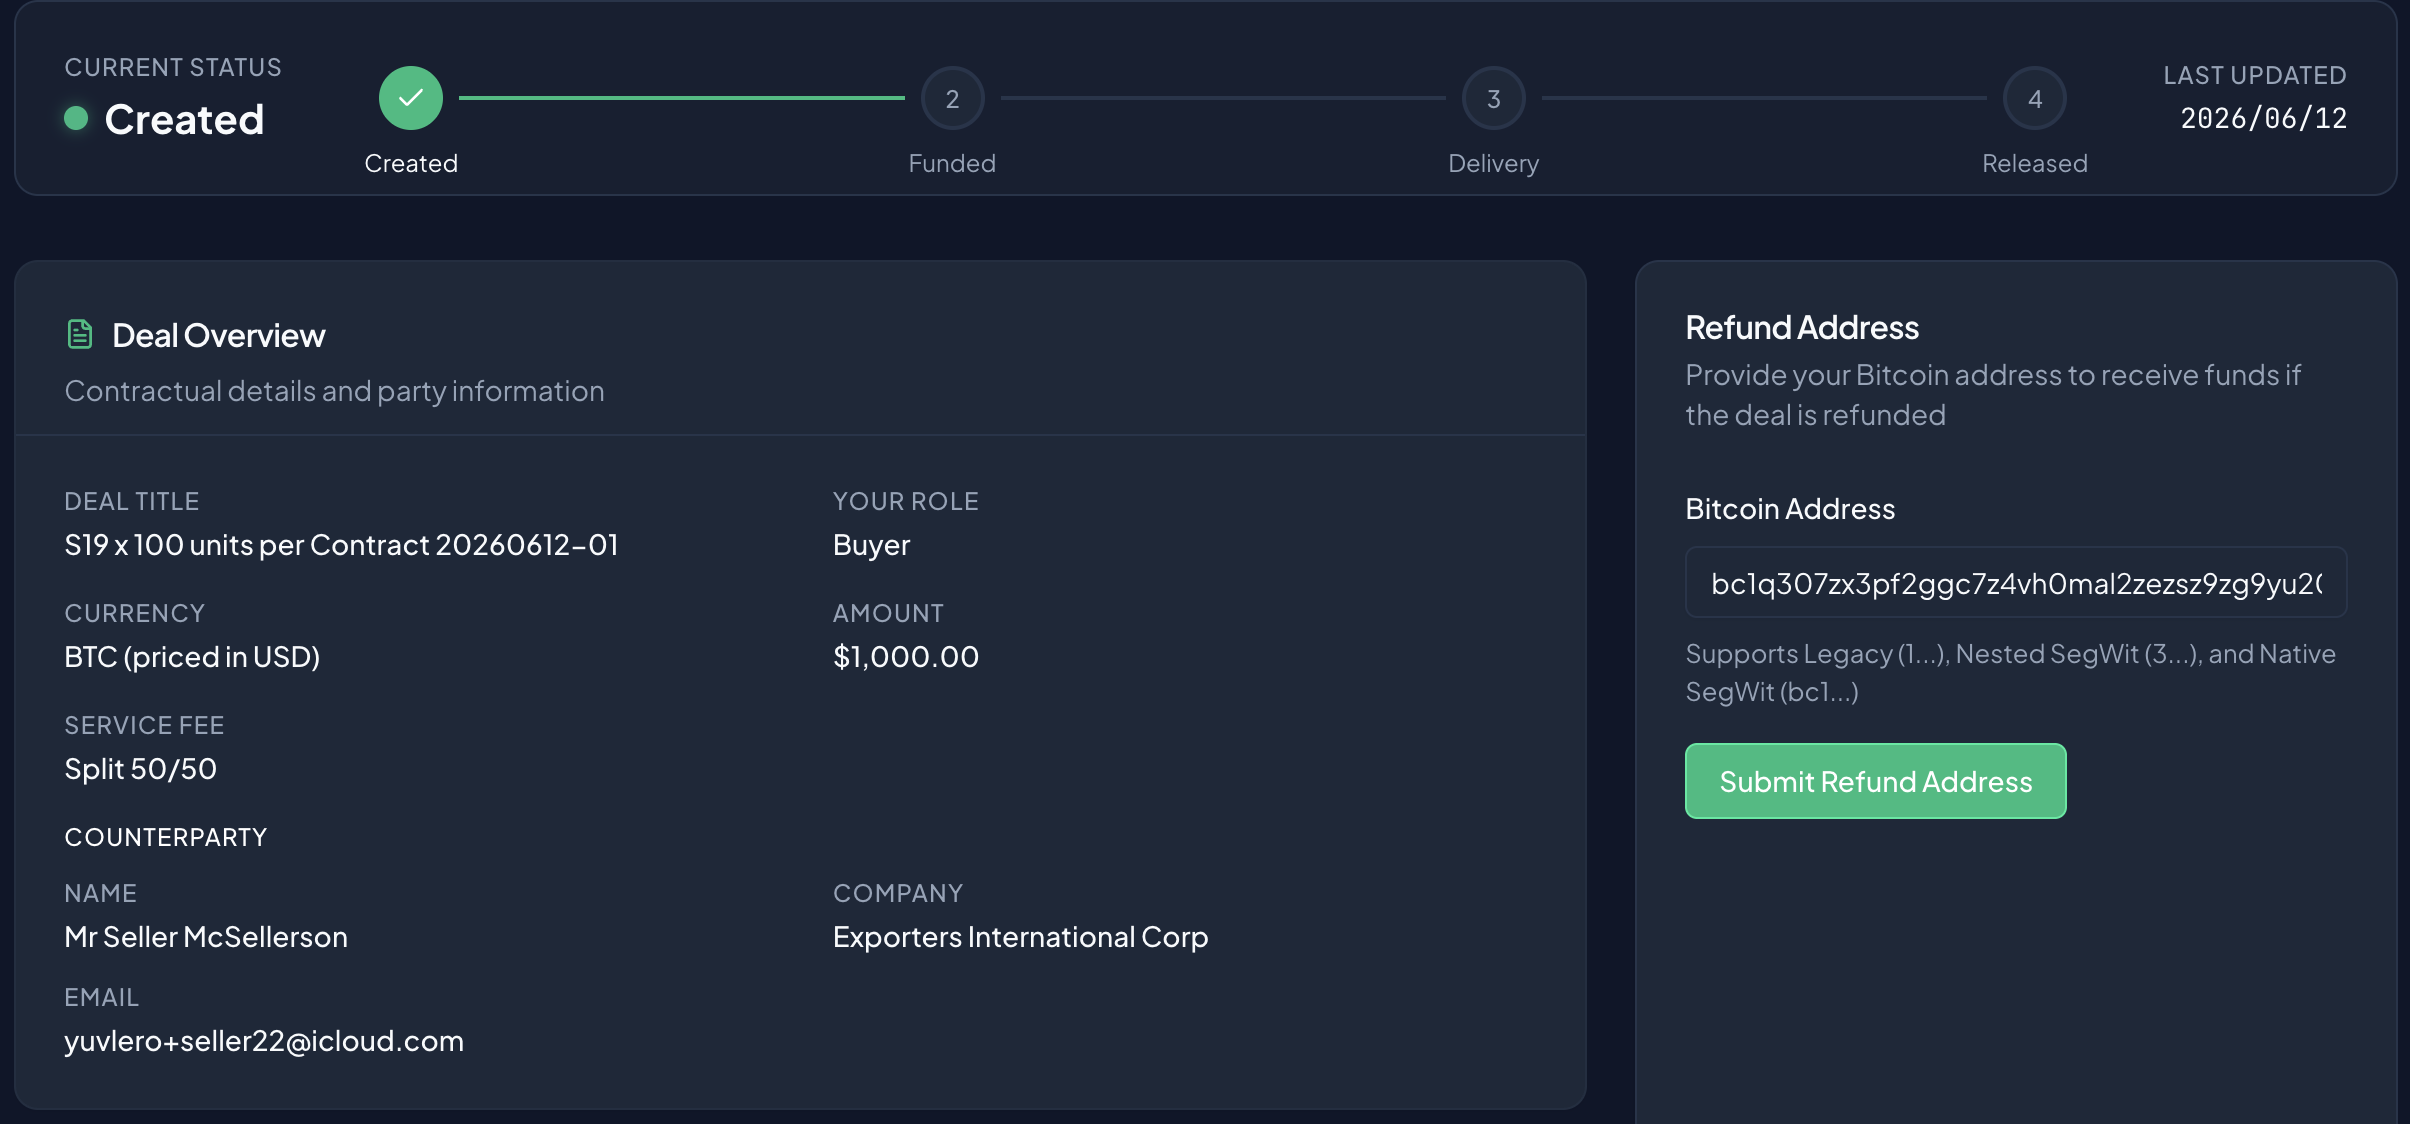
After you submit, you'll see a Waiting for seller note showing the address you locked in.
The seller's screen differs here: instead of a Refund Address card, the seller fills in a Payout Address — the address where they'll receive the funds if the deal is released.
Step 7: Review and acknowledge
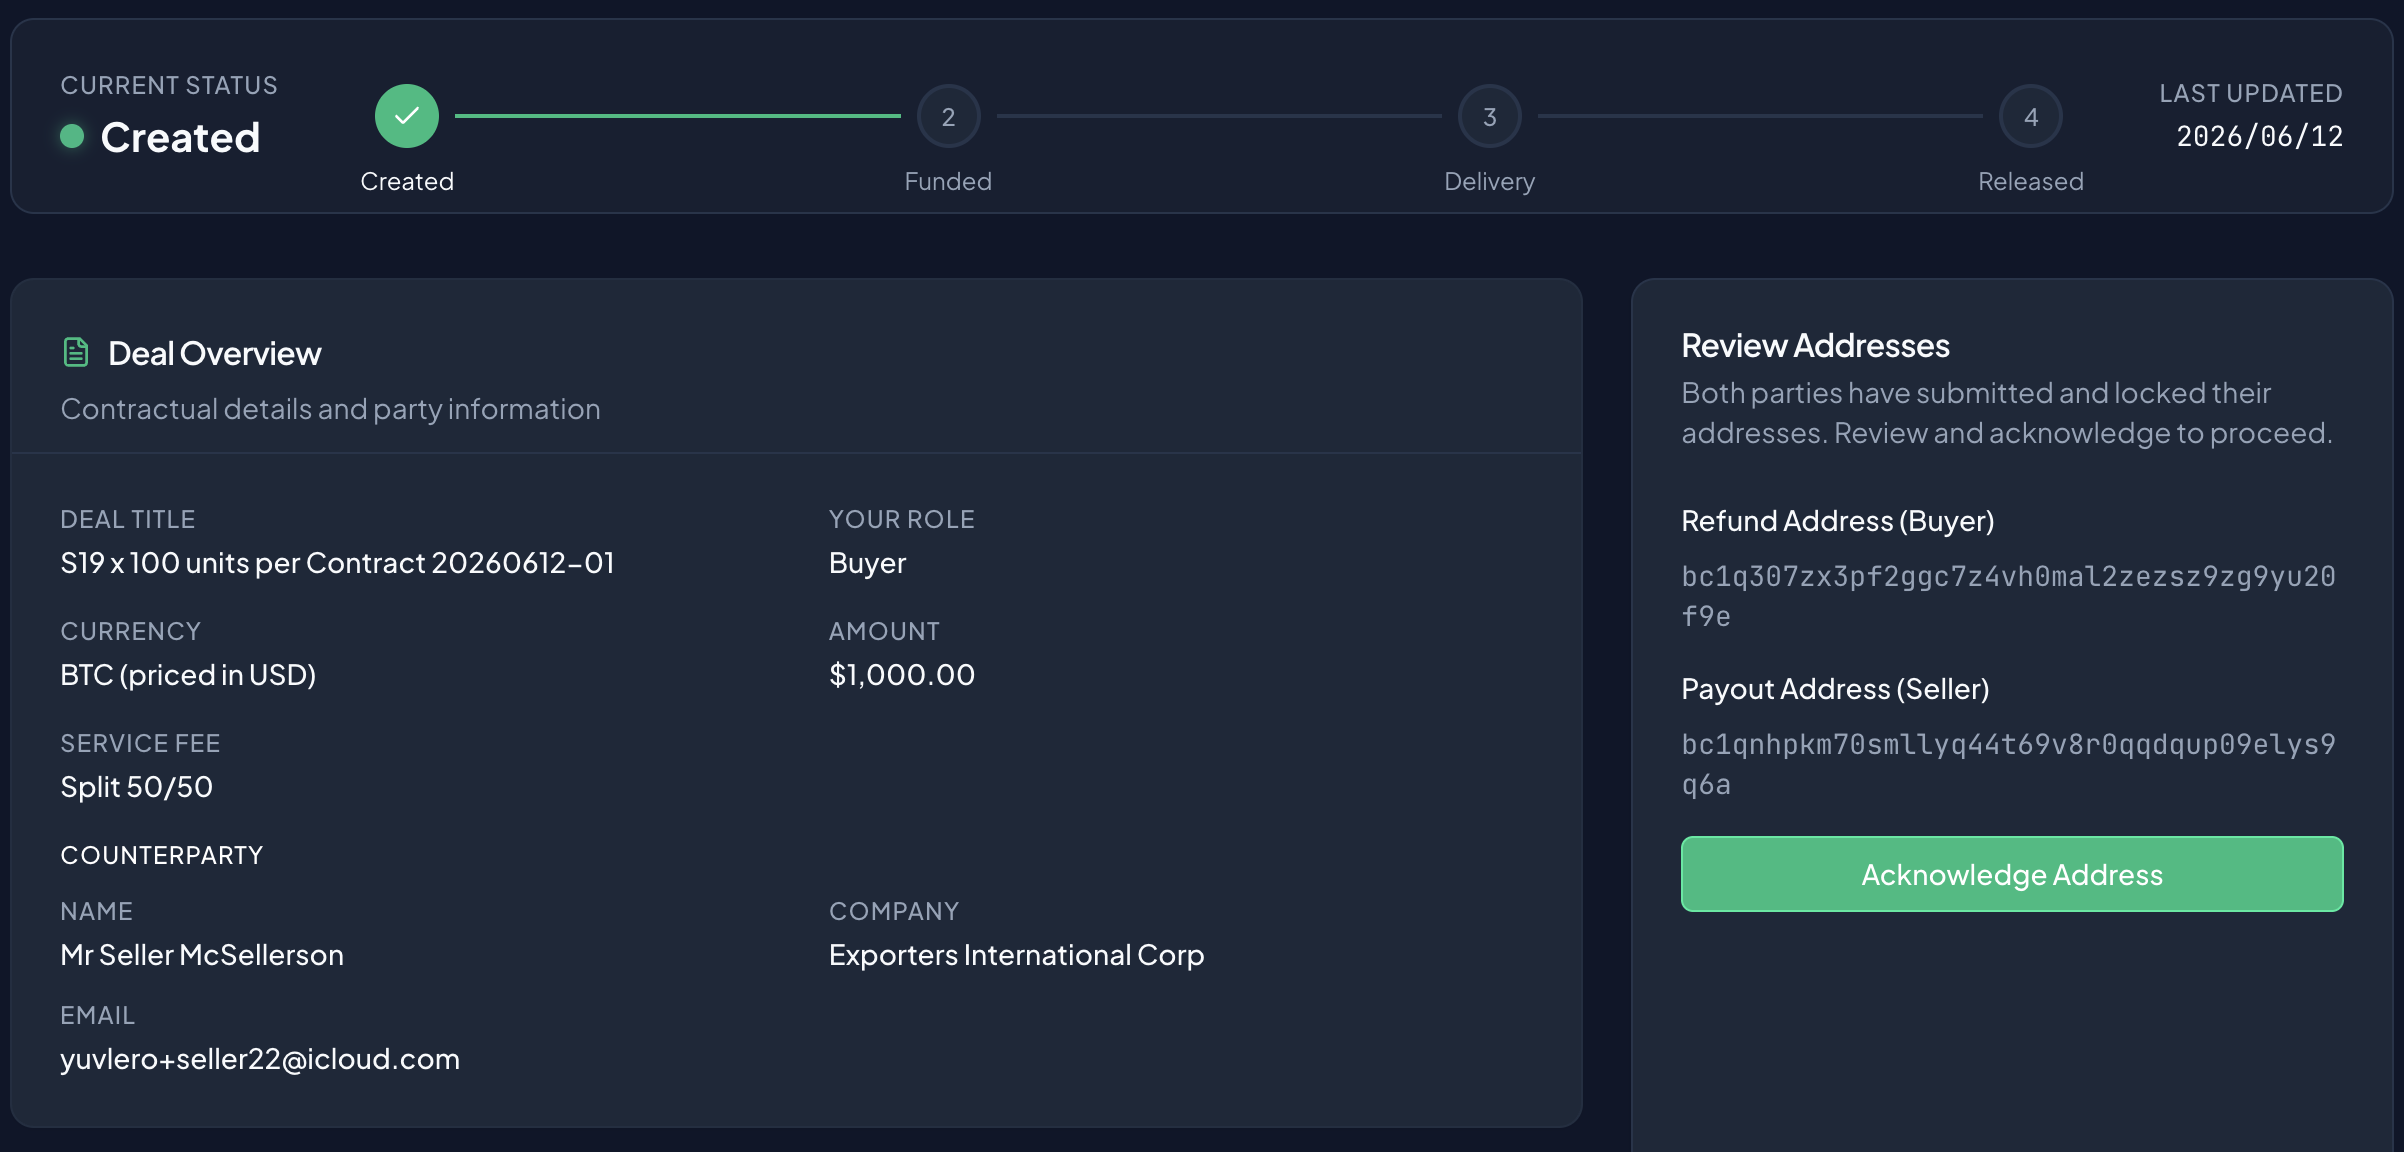
Once both addresses are in, the deal shows a Review Addresses step:
Both parties have submitted and locked their addresses. Review and acknowledge to proceed.
Check that both the Refund Address (Buyer) and Payout Address (Seller) look correct, then click Acknowledge Address. The seller does the same.
When both of you have acknowledged, Tetrapolar automatically creates the multisig escrow wallet and the deal becomes ready to fund.
Update as of July 21st, 2026
We have reduced the deal creation process to only one step on each side: the deal creator must provide their address upon deal creation, and the counterparty must provide their respective address upon accepting the deal. After this has been done, the deal goes straight to funding (next step).
Part 3 — Funding the Escrow
Step 8: Send the bitcoin
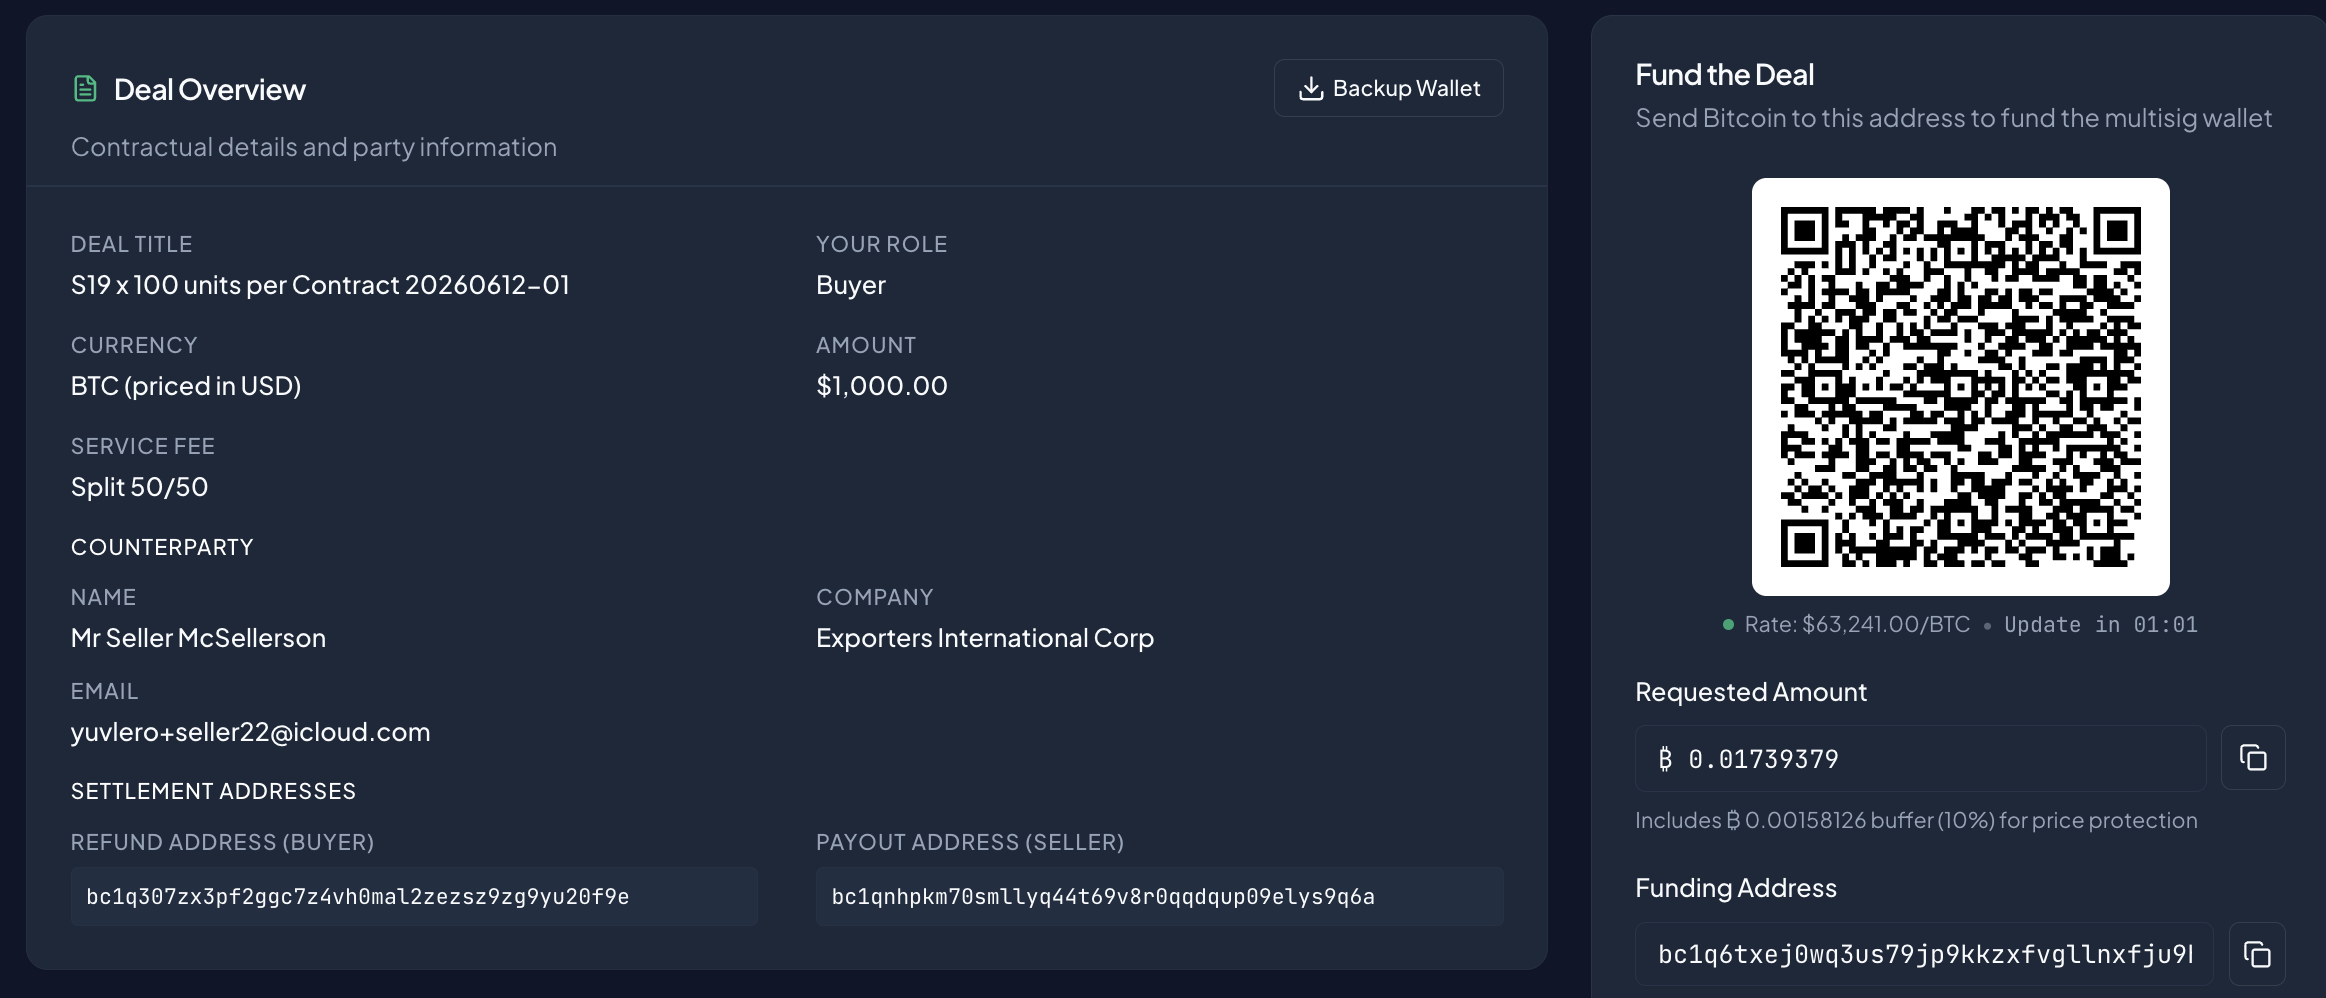
You'll see a card titled Fund the Deal:
Send Bitcoin to this address to fund the multisig wallet.
It shows everything you need:
- Requested Amount — how much BTC to send, calculated from your USD amount at the current rate, plus your funding buffer and any fee you're covering.
- Funding Address — the escrow's bitcoin address.
- A QR code encoding the address and amount together.
Scan the QR code with your wallet, or copy the address and amount separately and send the funds.
The seller's screen differs here: the seller isn't paying, so they see a Waiting for Funding card with the funding address for reference — no QR code and no requested amount.
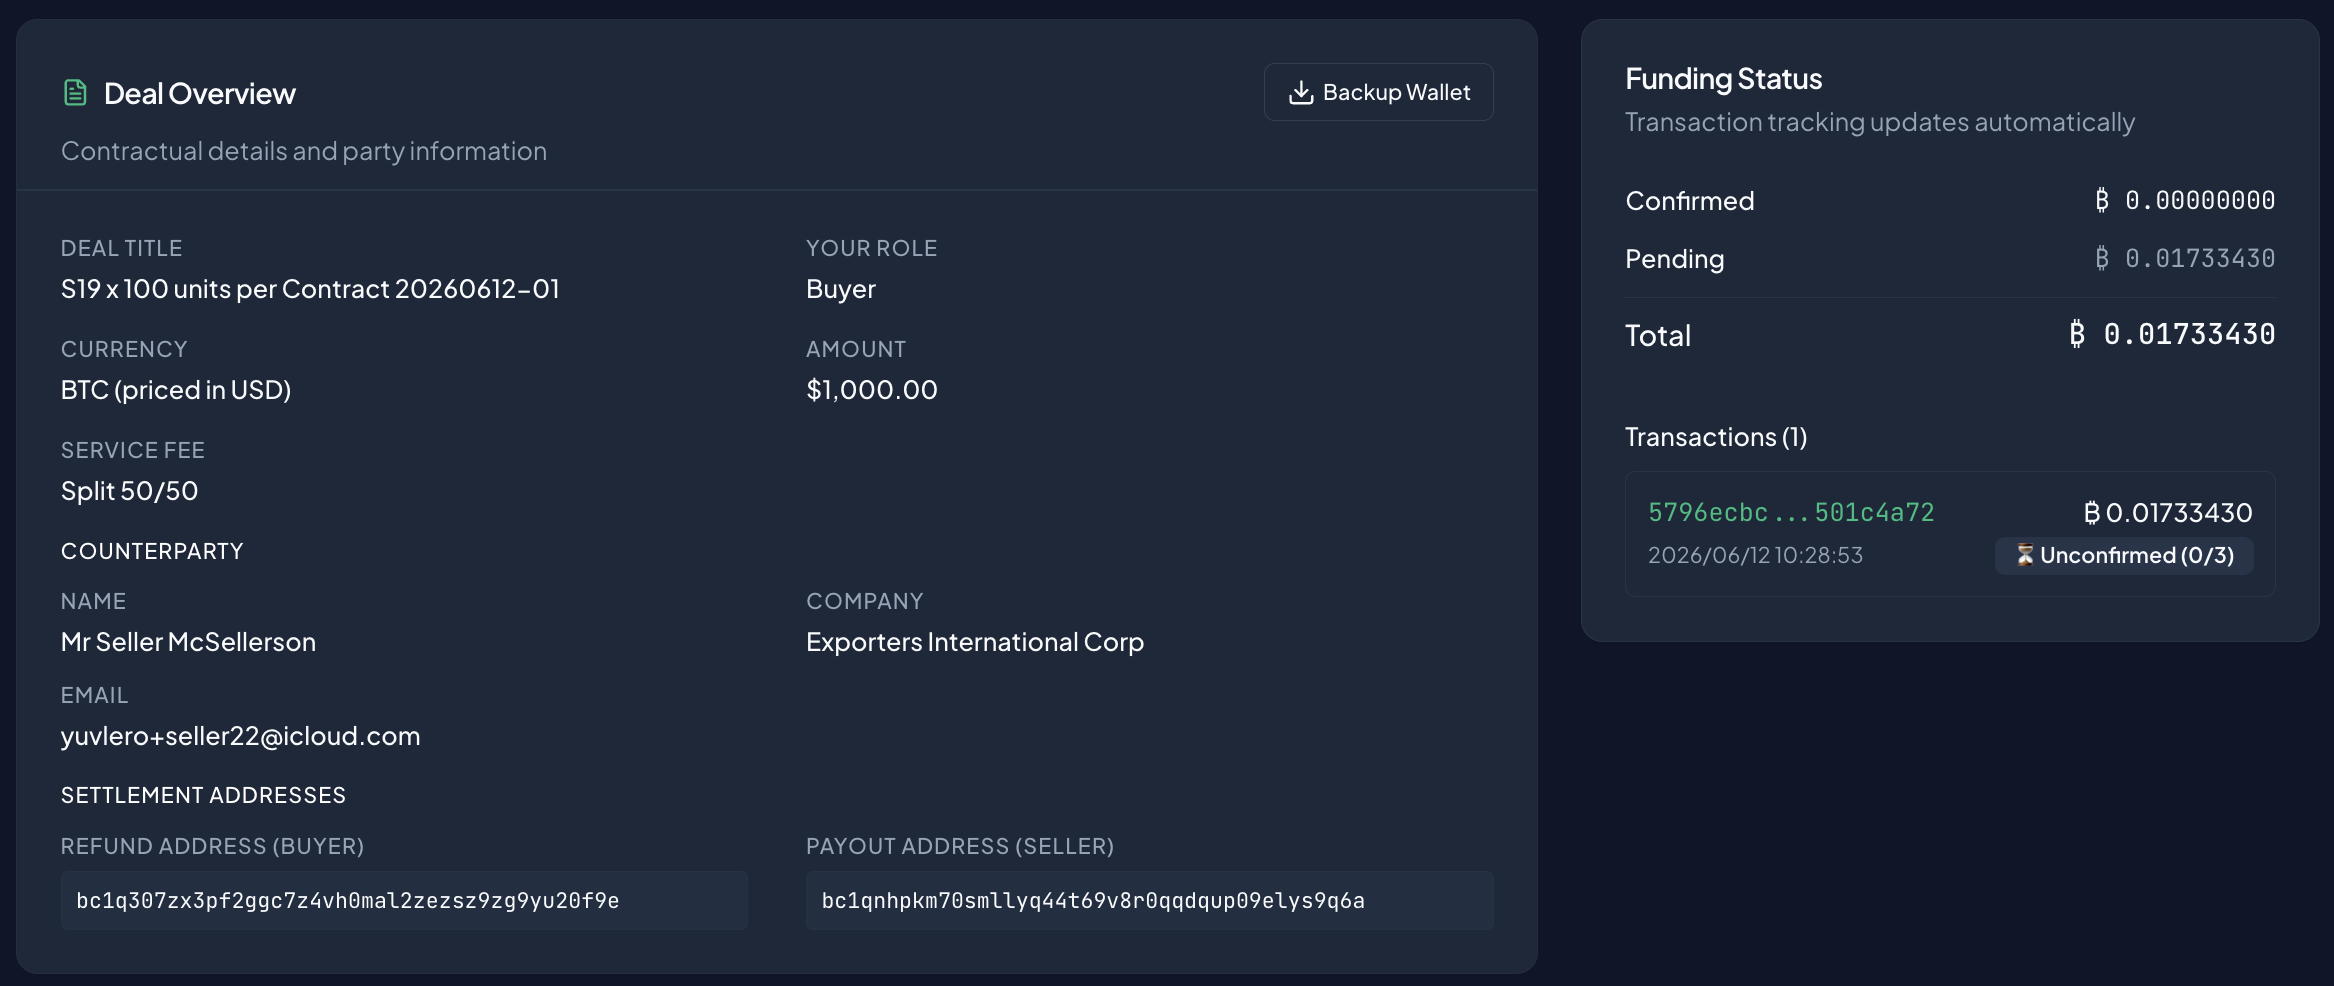
Step 9: Wait for confirmations
Once you send, a Funding Status card appears and tracks your transaction. It updates as the deposit is detected and then confirmed on‑chain. When it shows enough confirmations and reads Confirmed, the deal is fully funded.
Part 4 — Releasing the Funds
Step 10: Confirm you've received your goods
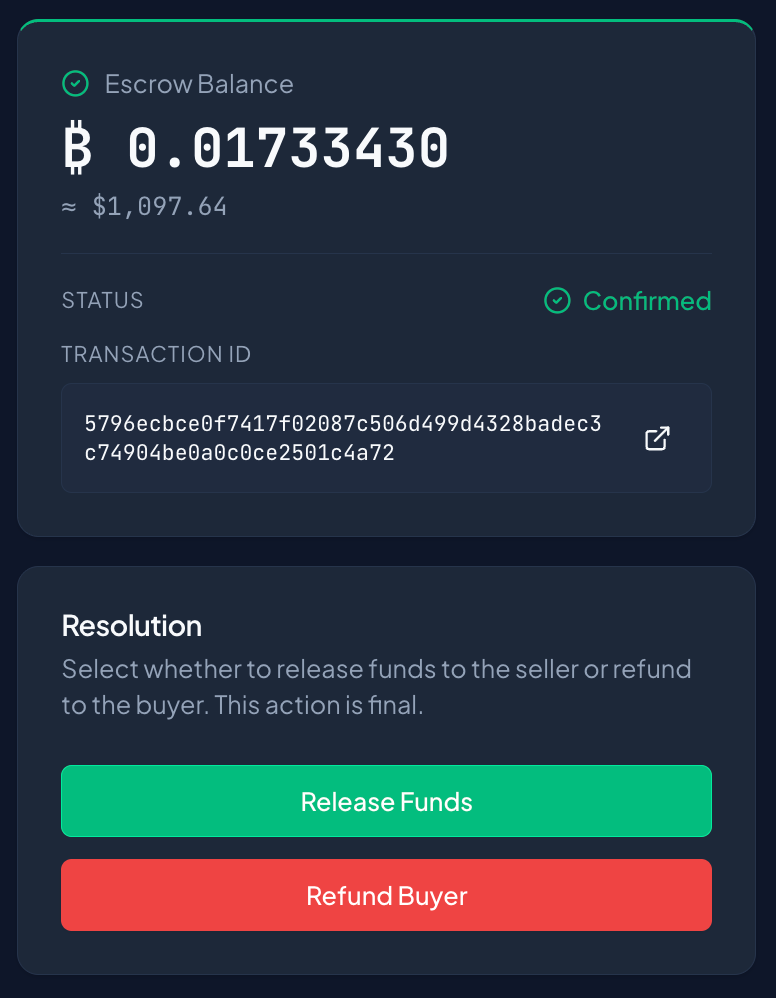
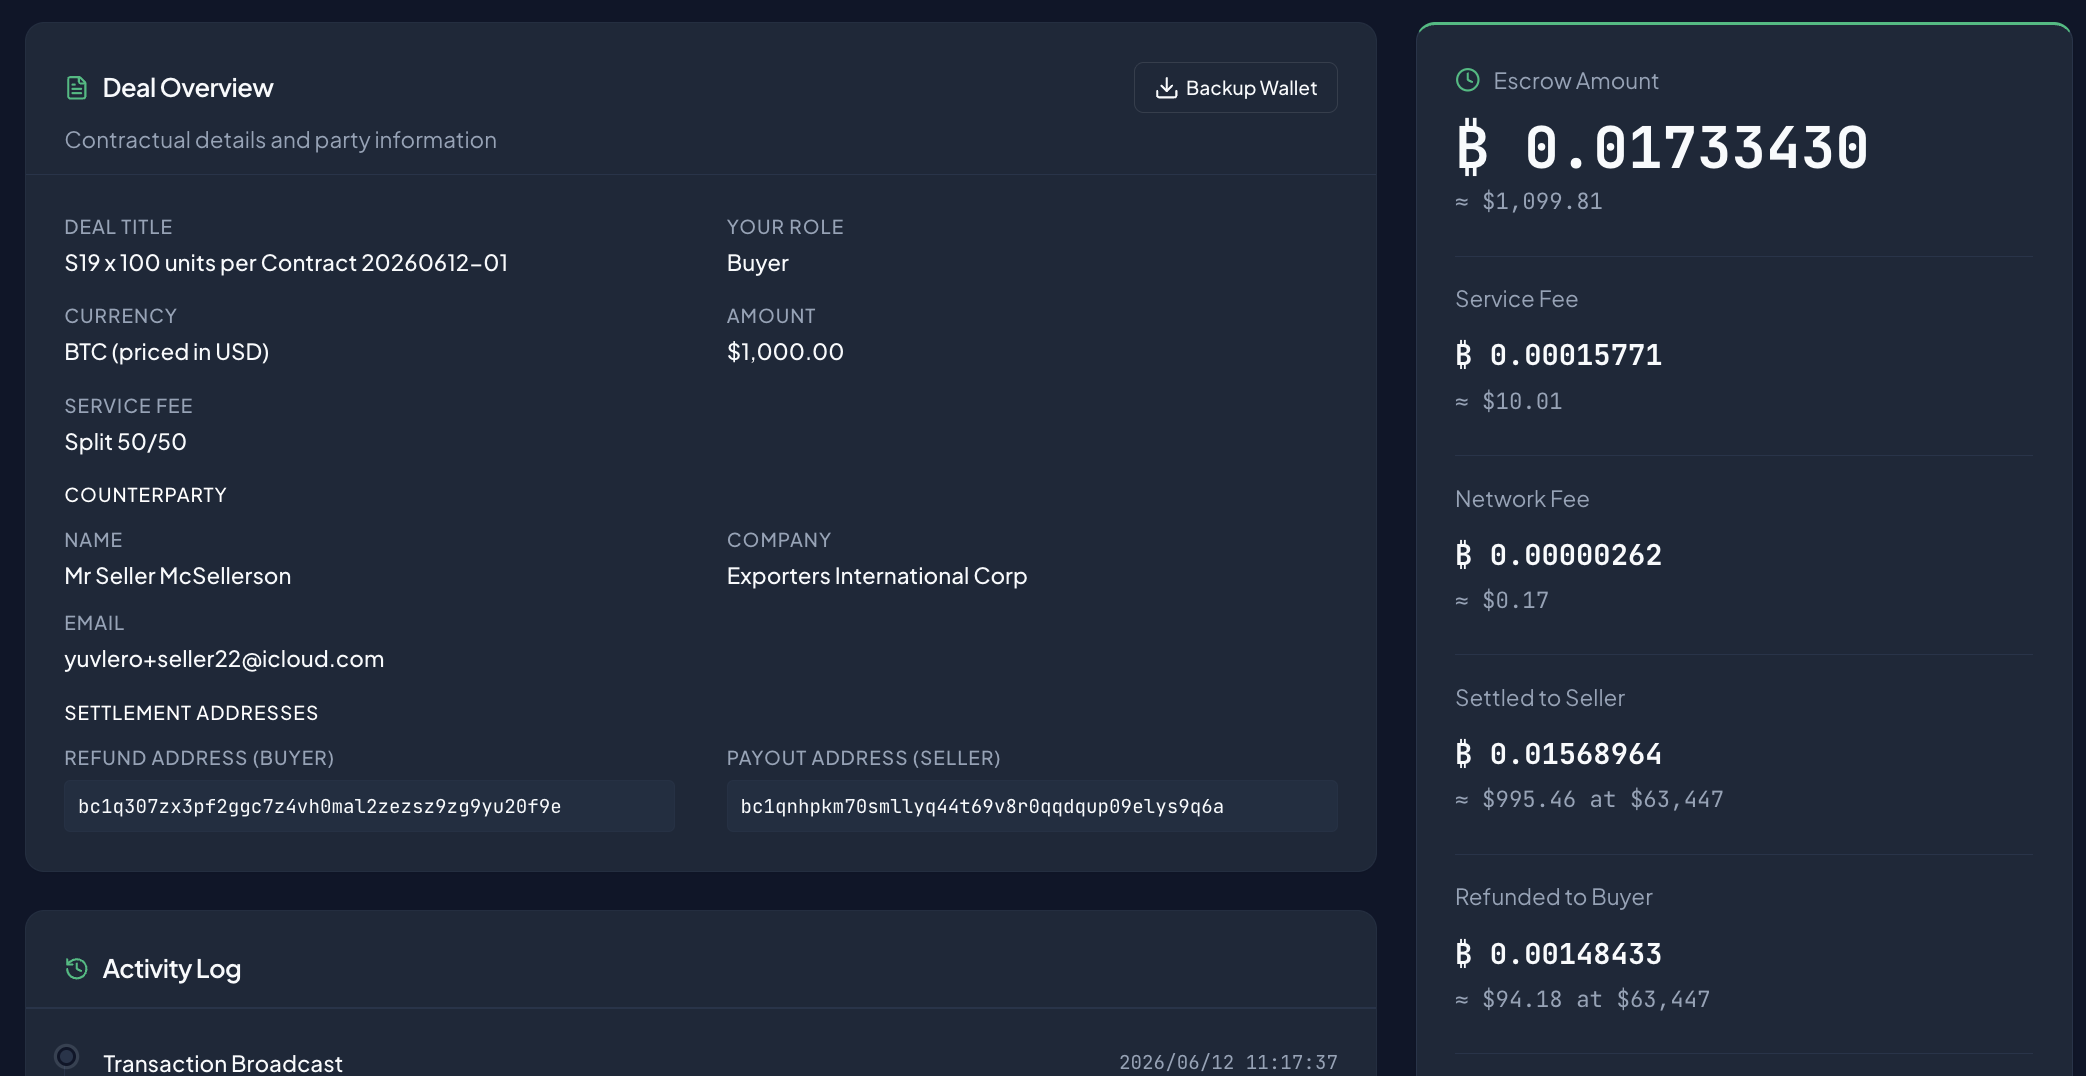
With the escrow funded, the seller delivers. Your deal now shows an Escrow Balance card (the confirmed amount and its current USD value) and a Resolution card:
Select whether to release funds to the seller or refund to the buyer. This action is final.
Once you've received and are happy with what you paid for, click Release Funds.
Step 11: Confirm the release
A dialog appears — Release Funds to Seller?:
This will release the escrowed funds to the seller's payout address. Once both parties agree, the transaction will be finalized.
Click Release Funds to confirm. The deal then shows Waiting for Seller while the seller agrees to the same outcome.

Part 5 — Signing and Settlement
Step 12: Sign the transaction
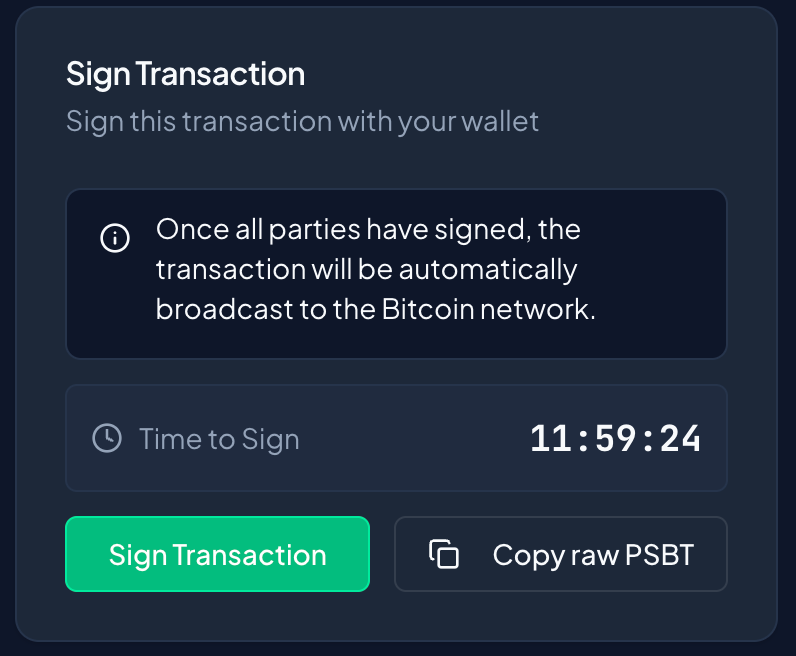
Once both sides have chosen to release, Tetrapolar builds the payout transaction and shows a Sign Transaction card:
Sign this transaction with your wallet.
There's a Time to Sign countdown — don't leave it too long. Click Sign Transaction.
Step 13: Review and unlock to sign
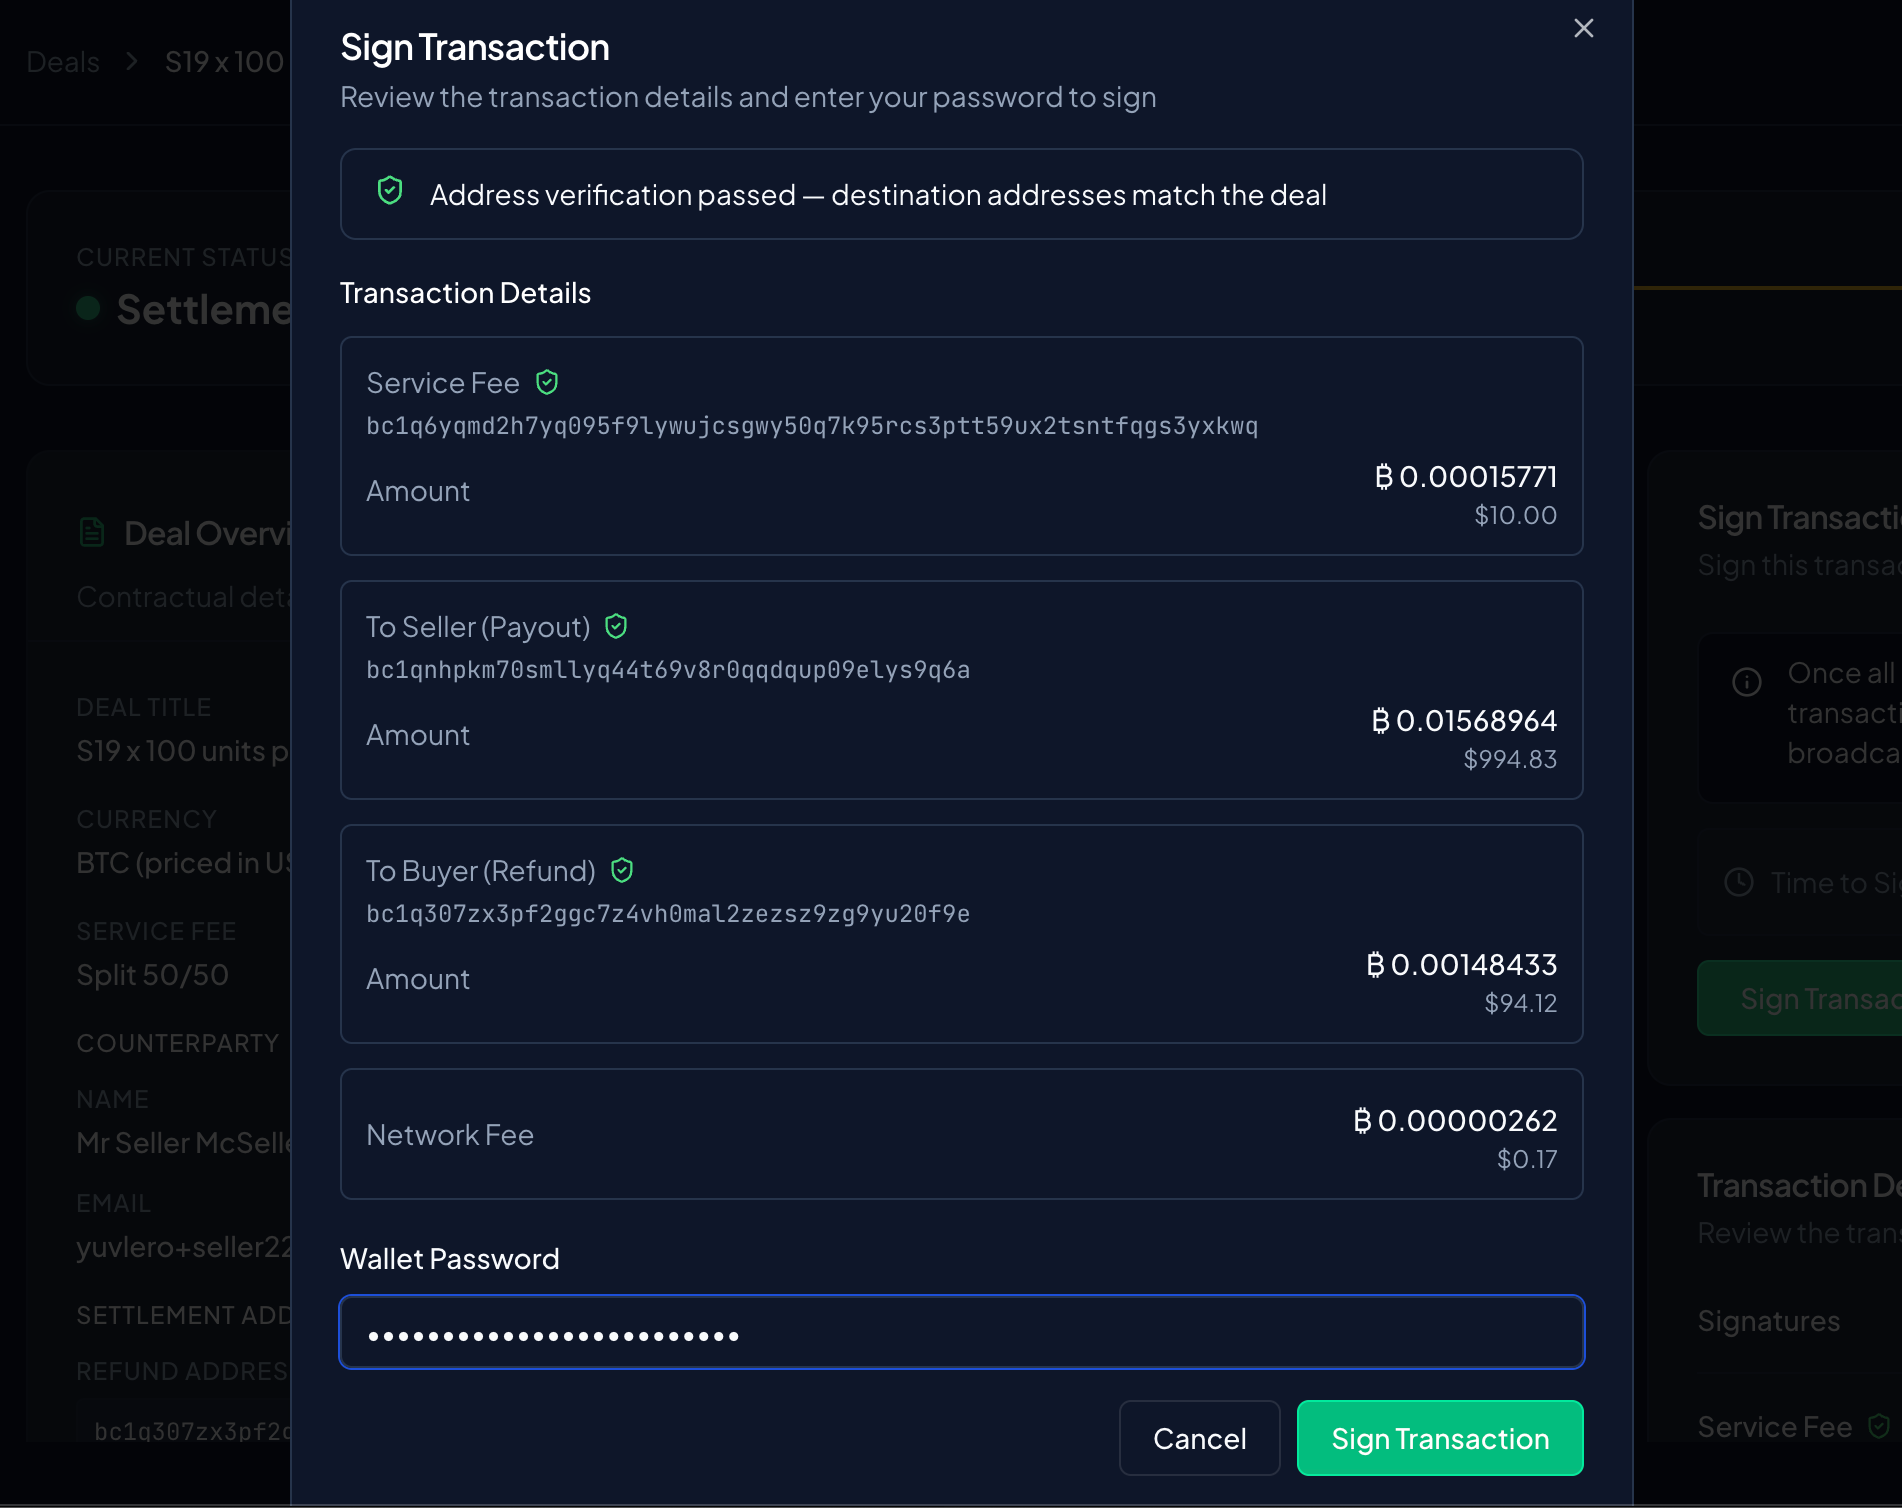
A dialog opens titled Sign Transaction:
Review the transaction details and enter your password to sign.
Review where the money is going (the seller's payout address, the service fee, and the network fee), enter your Wallet Password to unlock your keys, and sign.
After you sign, you'll see:
Your signature has been submitted. Waiting for other parties to sign.
The seller signs too. As soon as both signatures are in, Tetrapolar combines them and broadcasts the transaction to the Bitcoin network automatically — you don't have to do anything else.
Why you sign: the escrow is a multisig wallet, so funds can only move when the required signatures are collected. Your password unlocks your keys just long enough to sign this one transaction, then locks them again.
Step 14: Done — broadcast
Once broadcast, the deal shows the completed transaction: the amount Sent to Seller, the Service Fee and Network Fee, and a link to the transaction on a block explorer. The progress tracker reads Broadcast and after 3 confirmations on the bitcoin blockchain switches to Settled.
That's a full deal, start to finish. Your bitcoin stayed locked in escrow the entire time and only moved once both you and the seller agreed.
Quick Reminders
- You agree in dollars, you pay in bitcoin. The funding buffer covers rate movement; unused funds come back to you.
- Two addresses matter: your refund address (money back to you) and the seller's payout address (money to them).
- Nothing moves without both signatures. Releasing the funds takes your signature and the seller's.
- You'll need your wallet password to sign — that's the only time your keys are unlocked.